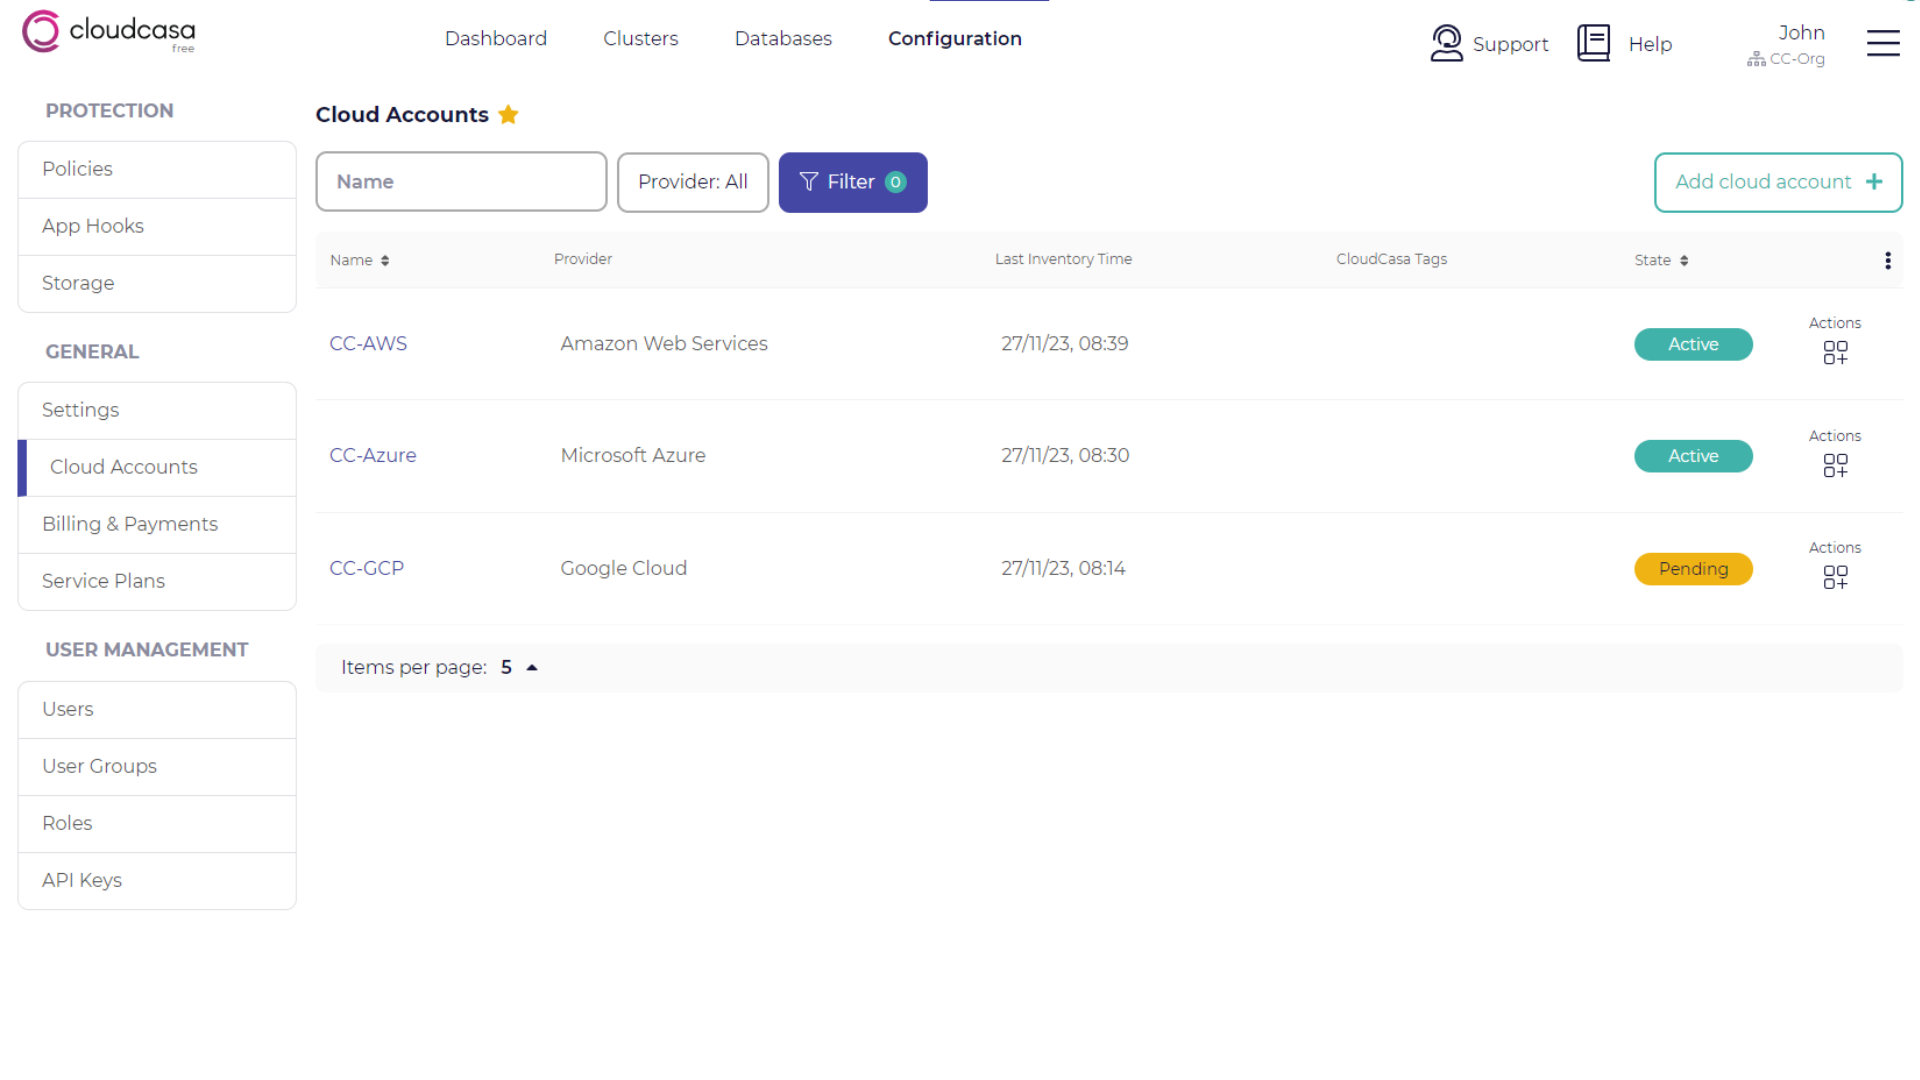
Cloud Accounts
The Cloud Accounts page lists your cloud accounts that have been registered (i.e. “linked”) with CloudCasa. Registering your cloud accounts with CloudCasa enables enhanced backup, restore, replication, and migration support for popular cloud Kubernetes services, and enables backup support for cloud database services. The following is the list of cloud providers and services with which CloudCasa natively integrates:
Elastic Kubernetes Service (EKS) from Amazon Web Services (AWS)
Amazon Relational Database Service (RDS) from AWS
Azure Kubernetes Service (AKS) from Microsoft Azure
Google Kubernetes Engine (GKE) from Google Cloud Platform (GCP)
After registering a cloud account, you can register and protect associated resources such as clusters and databases. In most cases these will be discovered automatically.
From the menu bar, click Configuration and Cloud Accounts. In the Cloud Accounts page, you can view, create, edit, and delete your cloud accounts.
Cloud Account instance pages
Click any cloud account in the list and you will see the instance page for the account. In the instance page, you will see detailed information about the cloud account and a list of associated clusters and databases. Edit and Remove buttons are available on the upper right of the page.
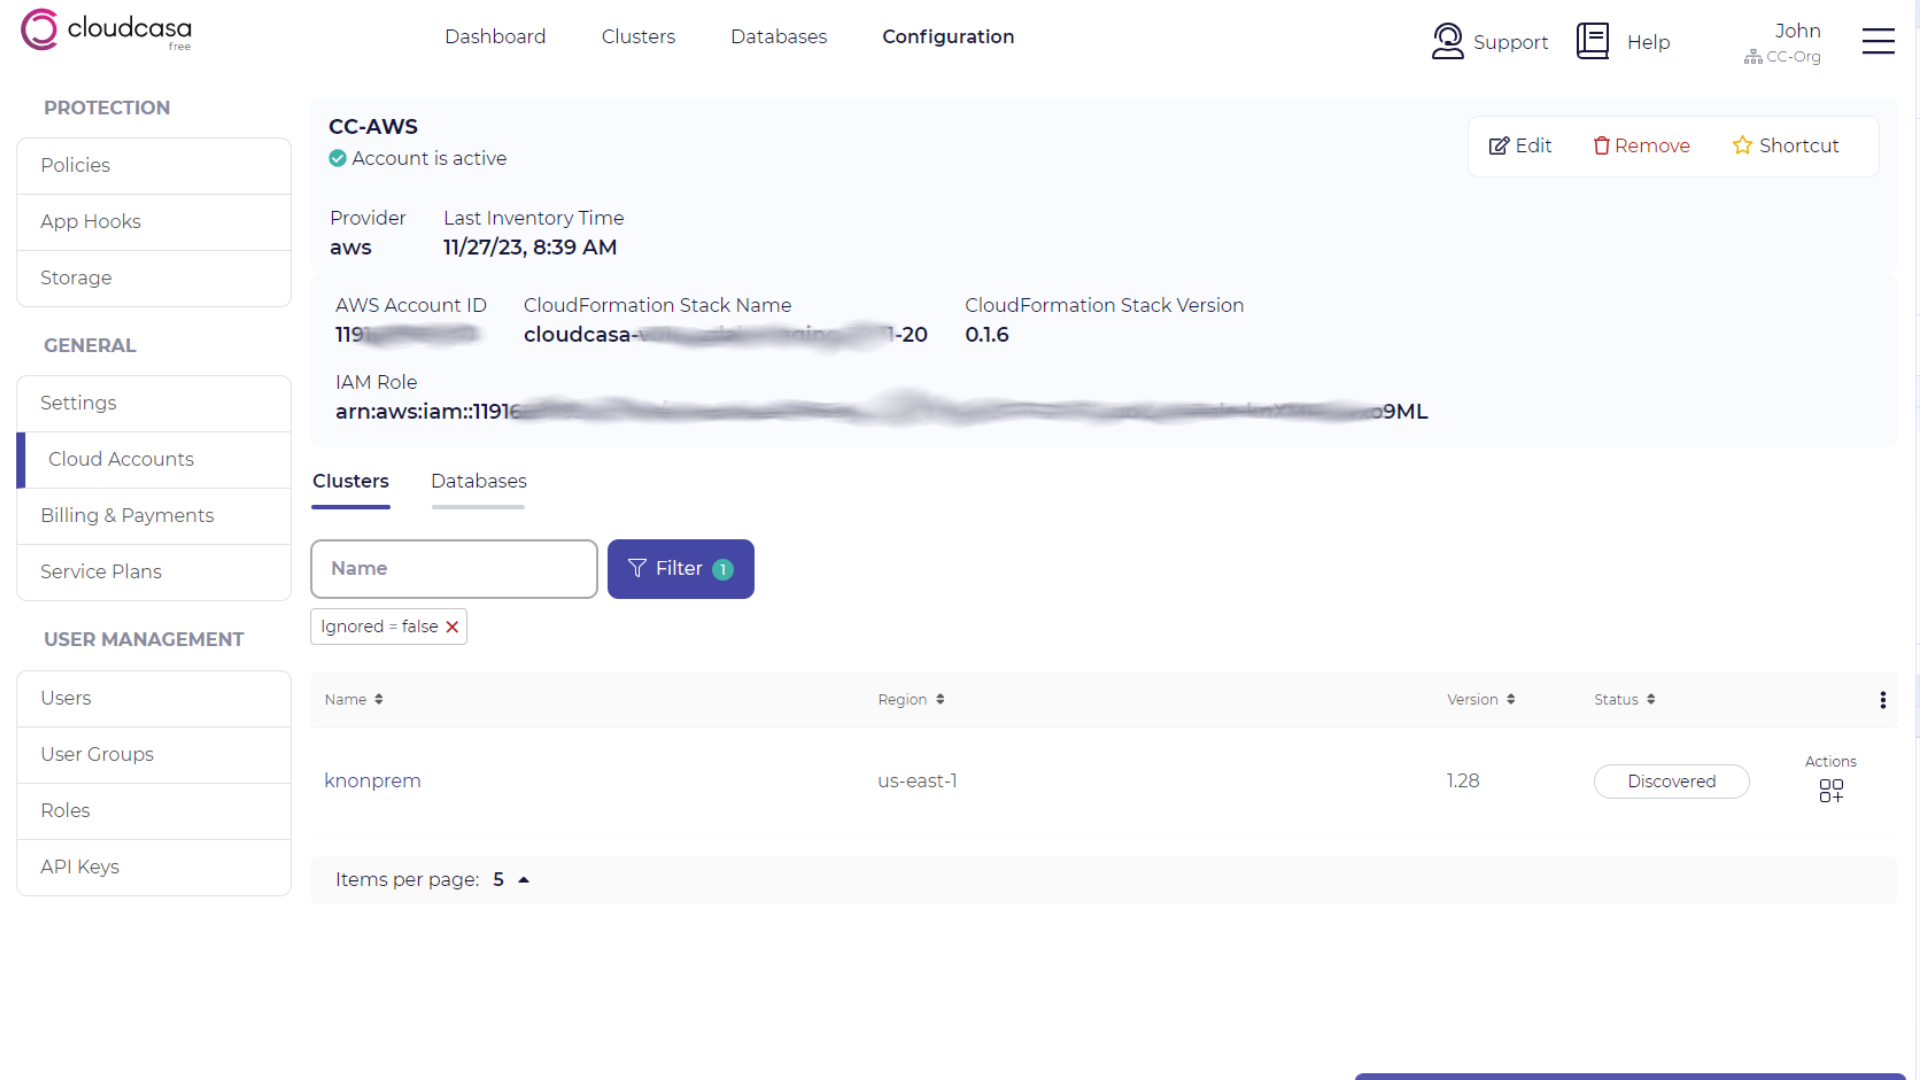
Cloud-specific information and status is displayed at the top of the page. The Last inventory time displayed indicates the last time an inventory job was run on this account to discover clusters, databases, etc. An inventory job can be started manually at any time by choosing Run Inventory under actions on the Cloud Accounts page.
A warning will be displayed near the top of the page if an update to the cloud account’s configuration is required. Clicking on it will take you to the Edit pane to perform the update (see below).
In the Clusters list tab, you will see all of the Kubernetes clusters discovered in the account. Note that by default Ignored (hidden) clusters are not shown, but you can display them by deleting the “Ignored=false” table filter. Several action buttons are available for each listed cluster, depending on what state it is in. Click Install next to any cluster to install the CloudCasa agent on it. Click Hide to hide a discovered cluster. Click Link to link a discovered cluster to a previously configured cluster definition. Click Re-register on a previously hidden cluster to un-hide it.
Note
If a cluster has previously been manually added to CloudCasa, and it is later auto-discovered via a linked cloud account, you can click on the auto-discovered cluster and choose to “link” it to the existing cluster. This prevents you from having to delete and re-add the cluster to take advantage of the additional capabilities provided by CloudCasa’s cloud integration. This situation is common if you manually add your clusters and then later decide to configure their associated cloud accounts.
In the Databases list tab, you will see a list of databases discovered in the account (AWS only).
Editing and updating cloud accounts
Click the Edit button on the instance page or select Edit from Actions on the Cloud Accounts page to open the Edit Cloud Account pane for a cloud account. You can modify the name, description, and tags. The Edit pane also has buttons at the top for Update available and Link.
The Update available button will be green if an update to the CloudFormation stack (AWS), ARM template (Azure), or Google Deployment Manager template (GCP) is available. Clicking it will open the appropriate cloud console in a new browser tab to allow you to perform the update, following a process similar to the add cloud account processes described below.
Clicking the Link button allows you to re-run the process for linking the associated cloud account (see below).
Adding a cloud account for Amazon Web Services (AWS)
Adding an AWS account to CloudCasa will allow the following functionality:
Auto-discovery of all Elastic Kubernetes Service (EKS) clusters and RDS databases in the account
Backup and restore of RDS databases
Backup and restore of EKS configuration
Auto-creation of EKS clusters on restore
Backup and restore of EKS VPC and subnet configuration
Backup and restore of load balancer configurations
Auto-creation of EKS clusters by migration jobs
Replication to EKS clusters
Take the following steps to register your AWS account with CloudCasa:
In the Cloud Accounts page, click Add Cloud Account + to open the Add Cloud Account wizard.
In Step 1 of the Add Cloud Account wizard, select Amazon Web Services in the Provider type section.
- Name
Enter a name to be used in CloudCasa for the new cloud account.
- Description (Optional)
Enter a brief description of the account you are adding so that users in your organization can more easily identify it.
- Tags (Optional)
Enter optional tags for use within CloudCasa.
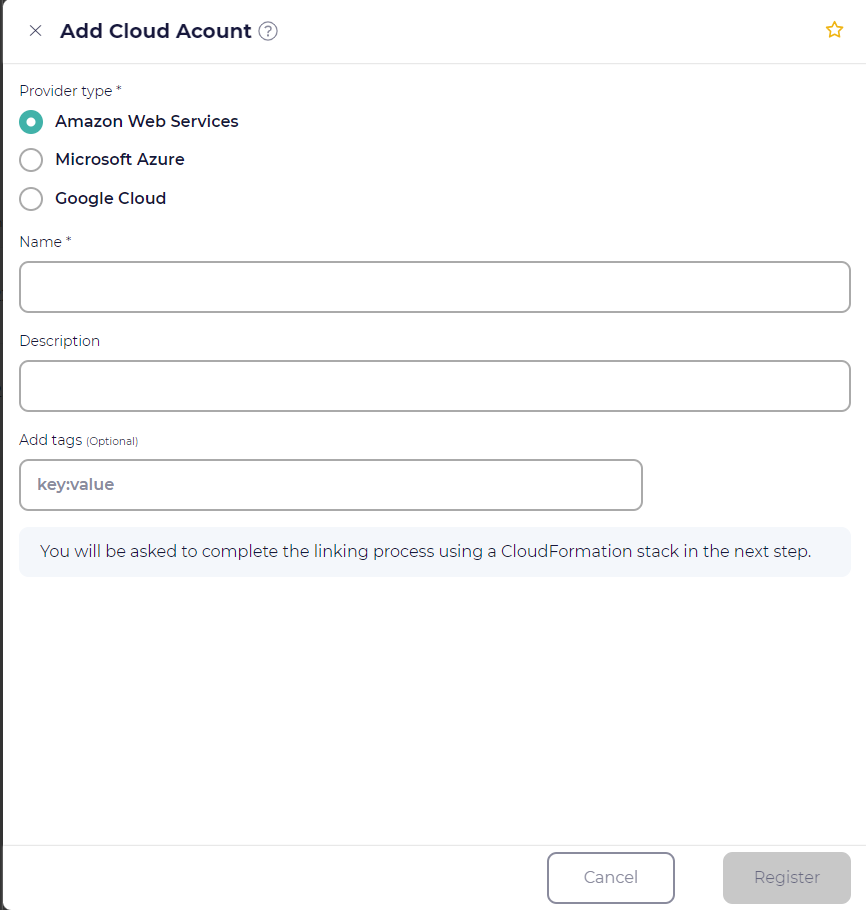
Click Register to create the account in CloudCasa.
In Step 2 of the Add Cloud Account wizard, click Launch Stack in the Create stack dialog to open the stack creation wizard in the AWS CloudFormation console. The CloudFormation stack will be used to grant CloudCasa the permissions it needs to operate (see below).
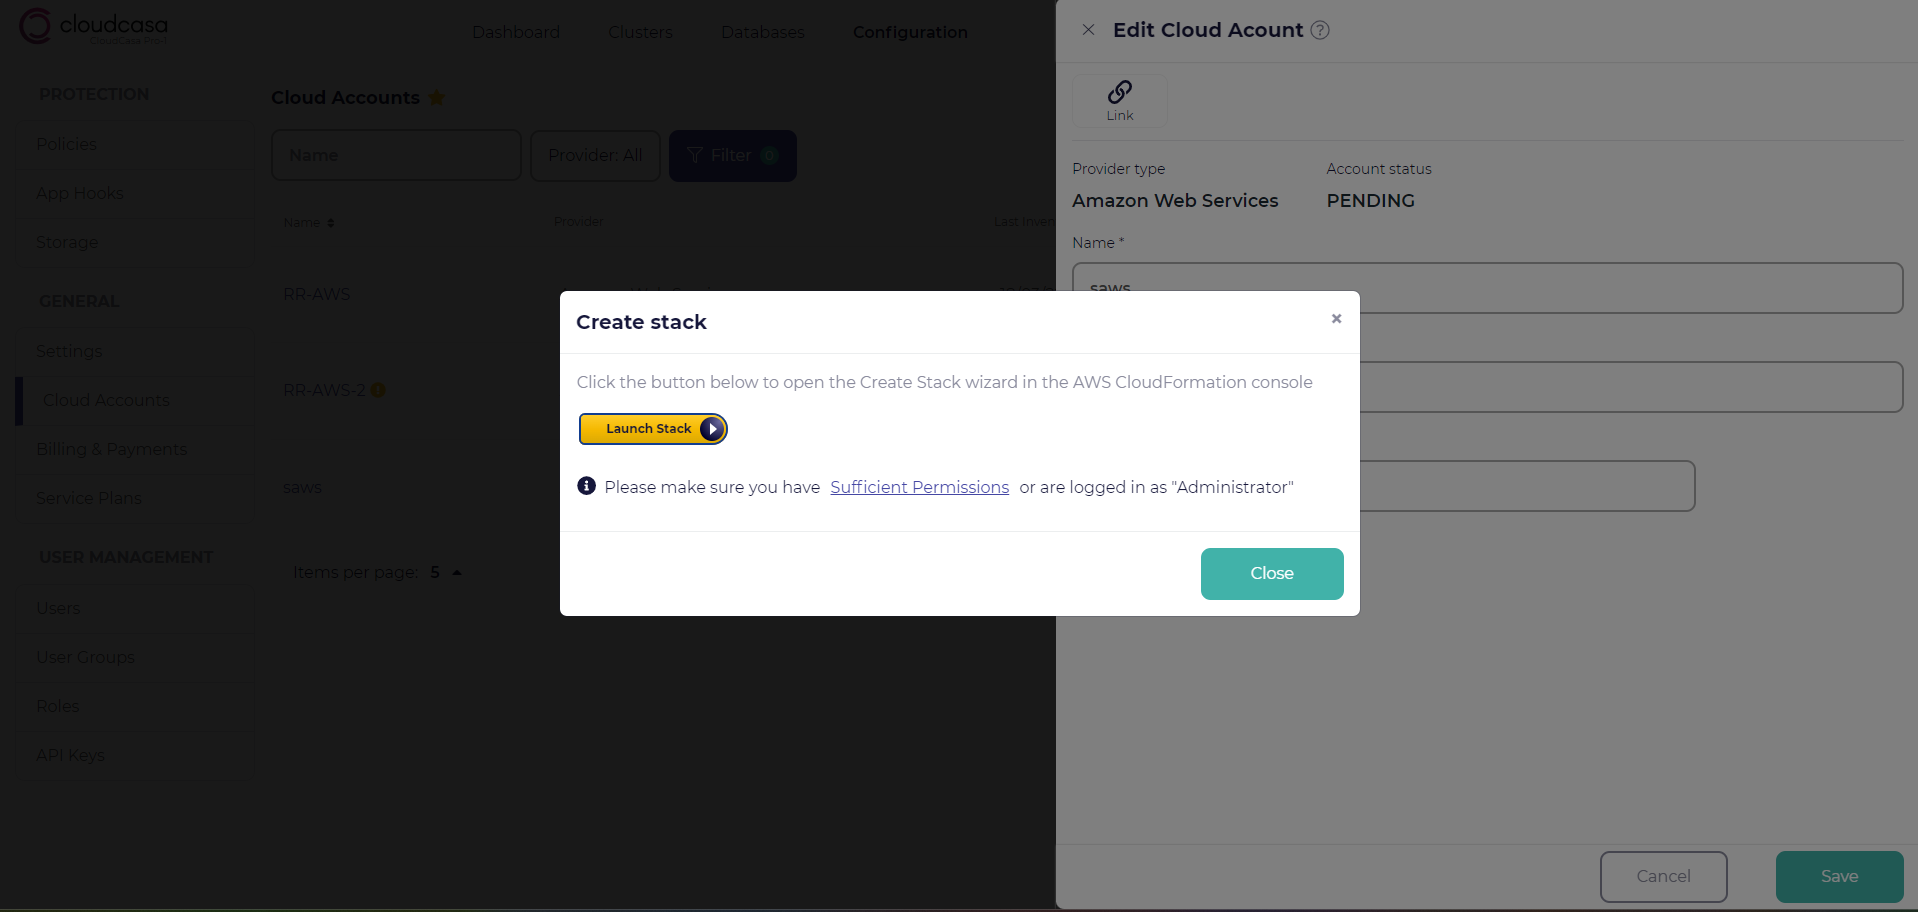
Tip
Allow pop-up windows in your web browser.
Ensure that you have sufficient permissions or you are able to log in to AWS as an Administrator.
After successfully linking, the popup will close, but this may take some time. The cloud account status will change to “Active”.
For the AWS permissions used by CloudCasa see Permissions required for AWS account linking.
Adding a cloud account for Microsoft Azure
Adding an Azure account to CloudCasa will allow the following functionality:
Auto-discovery of all Microsoft Azure Kubernetes Service (AKS) clusters
Auto-installation of CloudCasa agents on AKS
Backup and restore of AKS configuration
Auto-creation of AKS clusters on restore
Backup and restore of AKS VNet and subnet configuration
Auto-creation of AKS clusters by migration jobs
Replication to AKS clusters
Take the following steps to register your Azure account with CloudCasa:
In the Cloud Accounts page, click Add Cloud Account +.
In Step 1 of the Add Cloud Account wizard, select Microsoft Azure in the Provider type section. Enter the following details:
- Name
Enter a name to be used in CloudCasa for the new cloud account.
- Description (Optional)
Enter a brief description of the account you are adding so that users in your organization can more easily identify it.
- Tags (Optional)
Enter optional tags for use within CloudCasa.
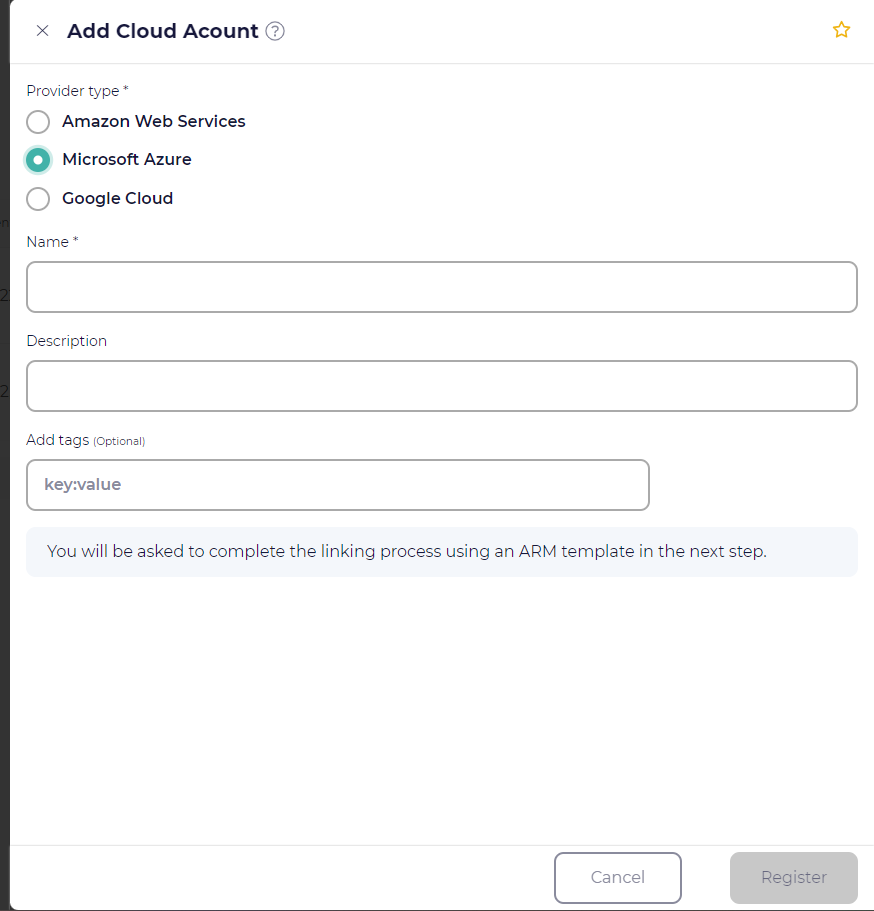
Click Register to create the account in CloudCasa.
In Step 2 of the Add Cloud Account wizard, click Deploy to Azure in the Create ARM template dialog. The ARM template will be used to grant CloudCasa the permissions it needs to operate (see below).
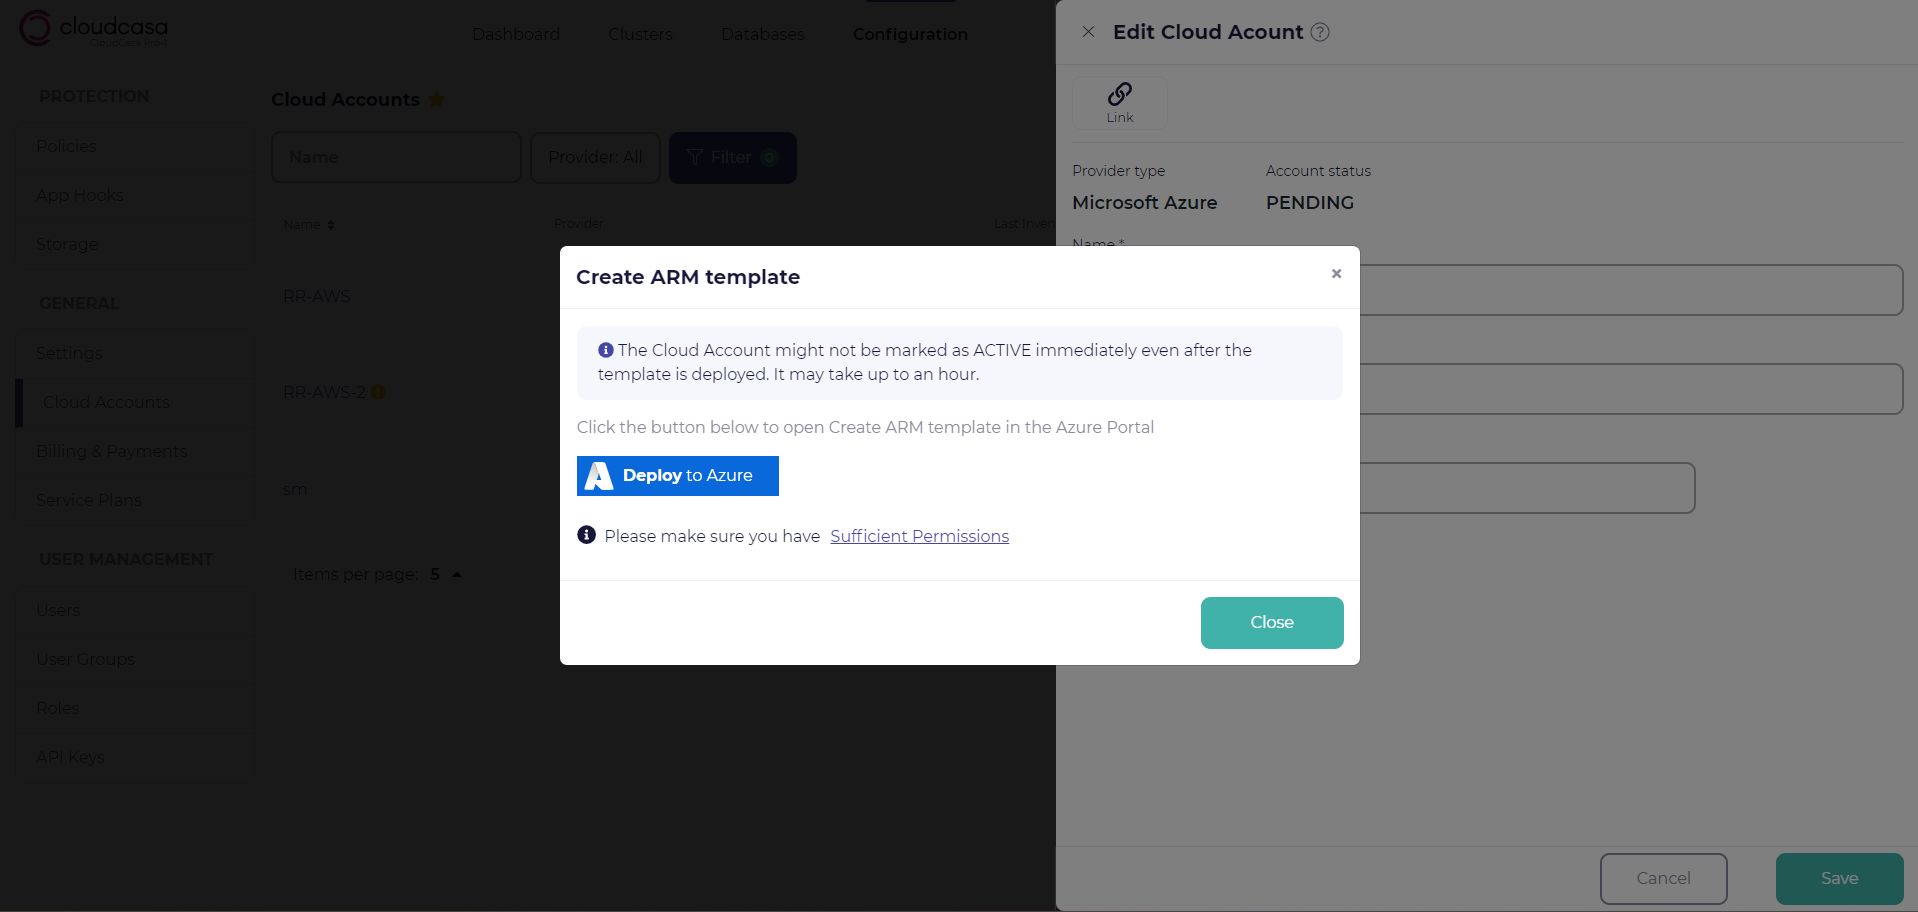
Tip
Allow pop-up windows in your web browser.
Ensure that you have sufficient permissions.
After successfully linking, the popup will close, but this may take some time. The cloud account status will change to “Active”.
For the Azure permissions used by CloudCasa see Permissions required for Azure account linking.
Adding a cloud account for Google Cloud Platform (GCP)
Adding a GCP account to CloudCasa will allow the following functionality:
Auto-discovery of all Google Kubernetes Engine (GKE) clusters
Auto-installation of CloudCasa agents on GKE
Backup and restore of GKE configuration
Auto-creation of GKE clusters on restore
Backup and restore of GKE VPC and subnet configuration
Auto-creation of GKE clusters by migration jobs
Replication to GKE clusters
Take the following steps to register your GCP account with CloudCasa:
In the Cloud Accounts page, click Add Cloud Account +.
In Step 1 of the Add Cloud Account wizard, select Google Cloud in the Provider type section. Enter the following details:
- Name
Enter a name to be used in CloudCasa for the new cloud account.
- Description (Optional)
Enter a brief description of the account you are adding so that users in your organization can more easily identify it.
- Tags (Optional)
Enter optional tags for use within CloudCasa.
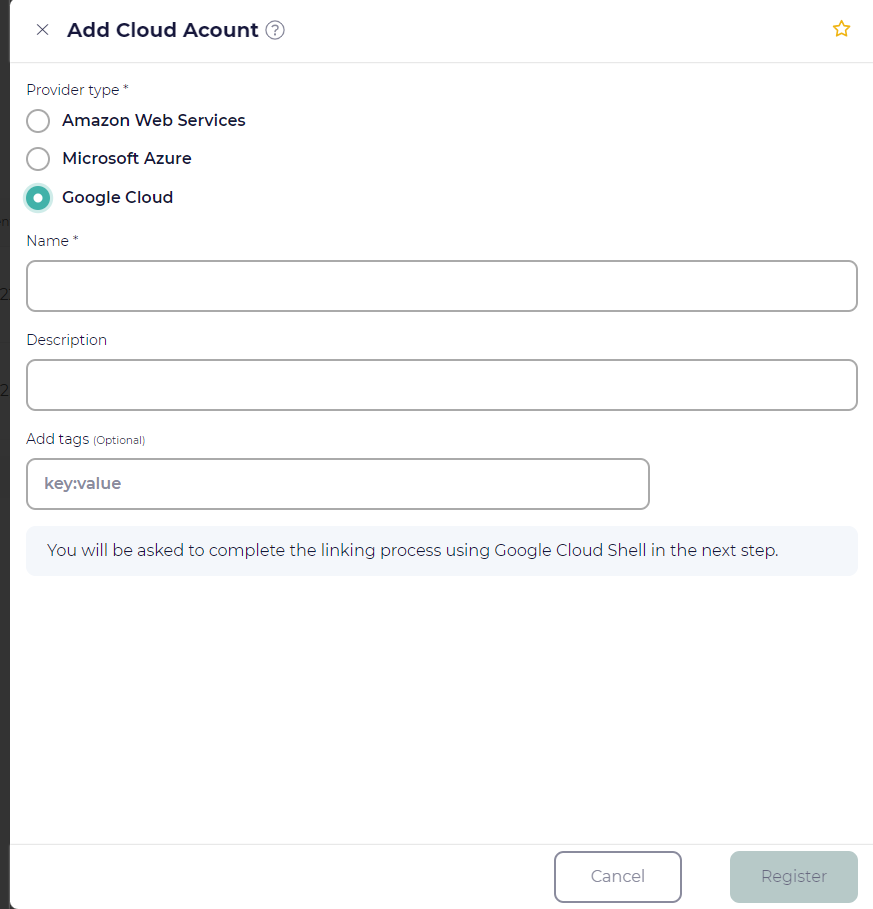
Click Register to create the account in CloudCasa.
In Step 2 of the Add Cloud Account wizard, click Open in Google Cloud Shell in the Integrate your GCP project section.
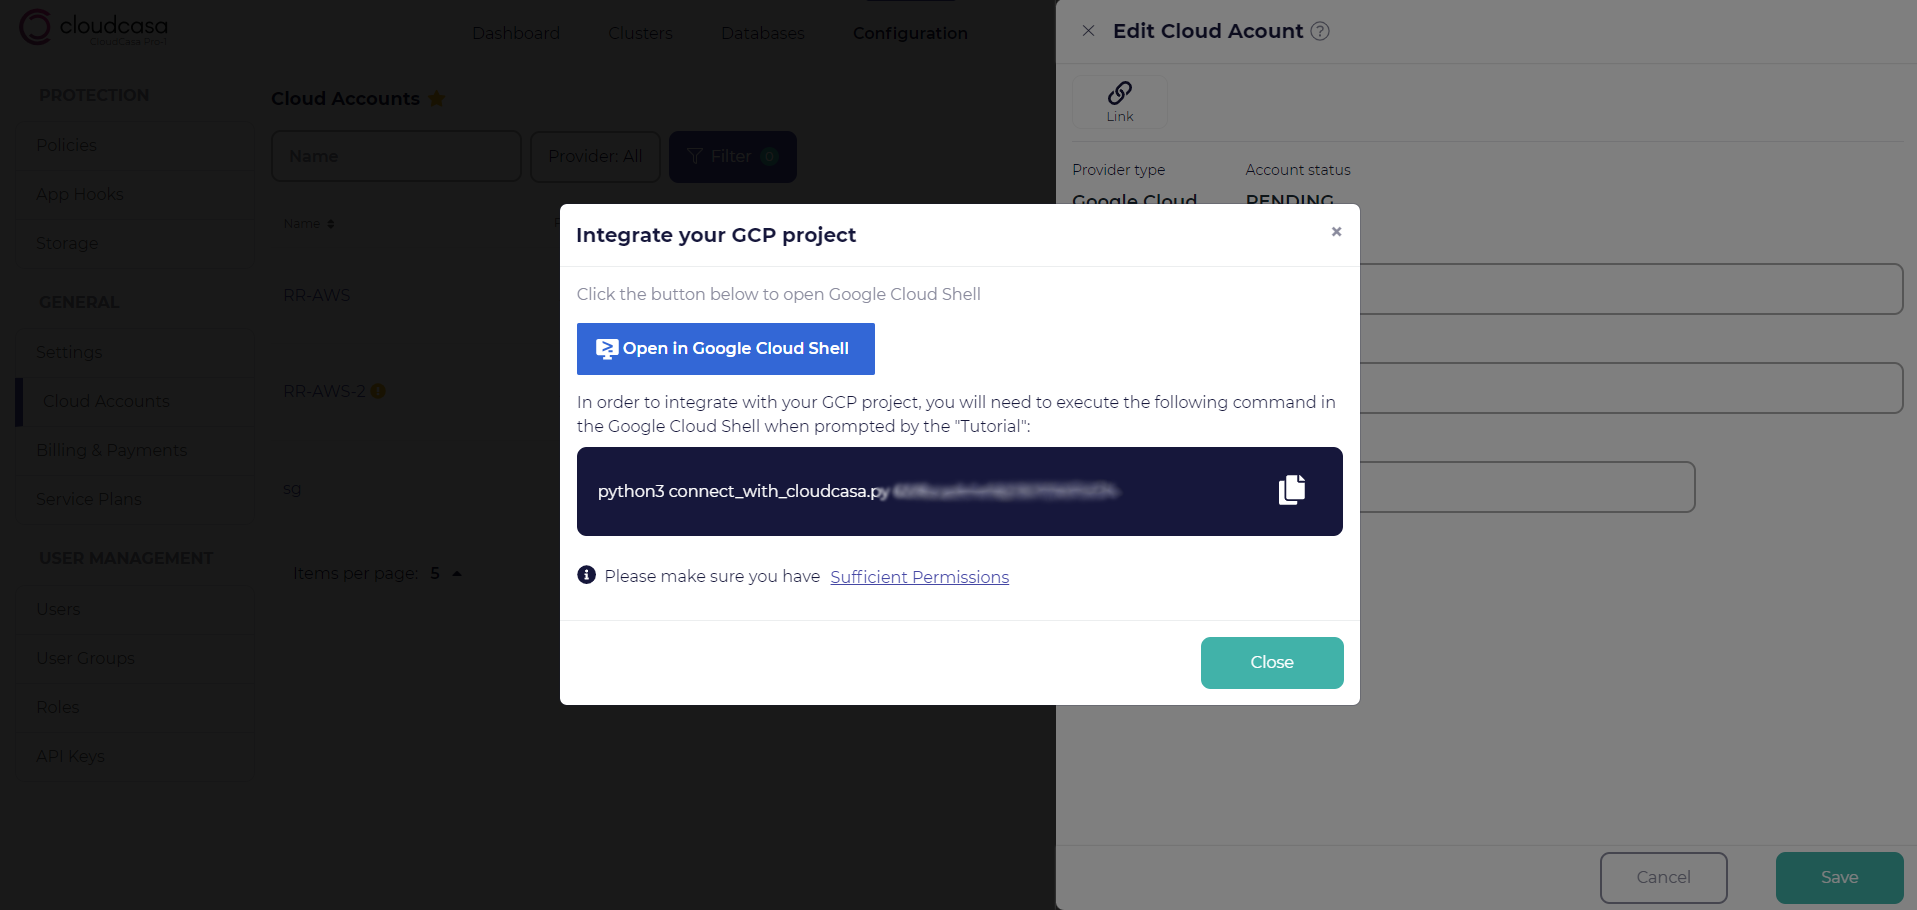
Tip
Allow pop-up windows in your web browser.
Ensure that you have sufficient permissions.
After successfully linking, the popup will close, but this may take some time. The cloud account status will change to “Active”.
For the GCP permissions used by CloudCasa see Permissions required for GCP account linking.