Creating Clusters With CloudCasa
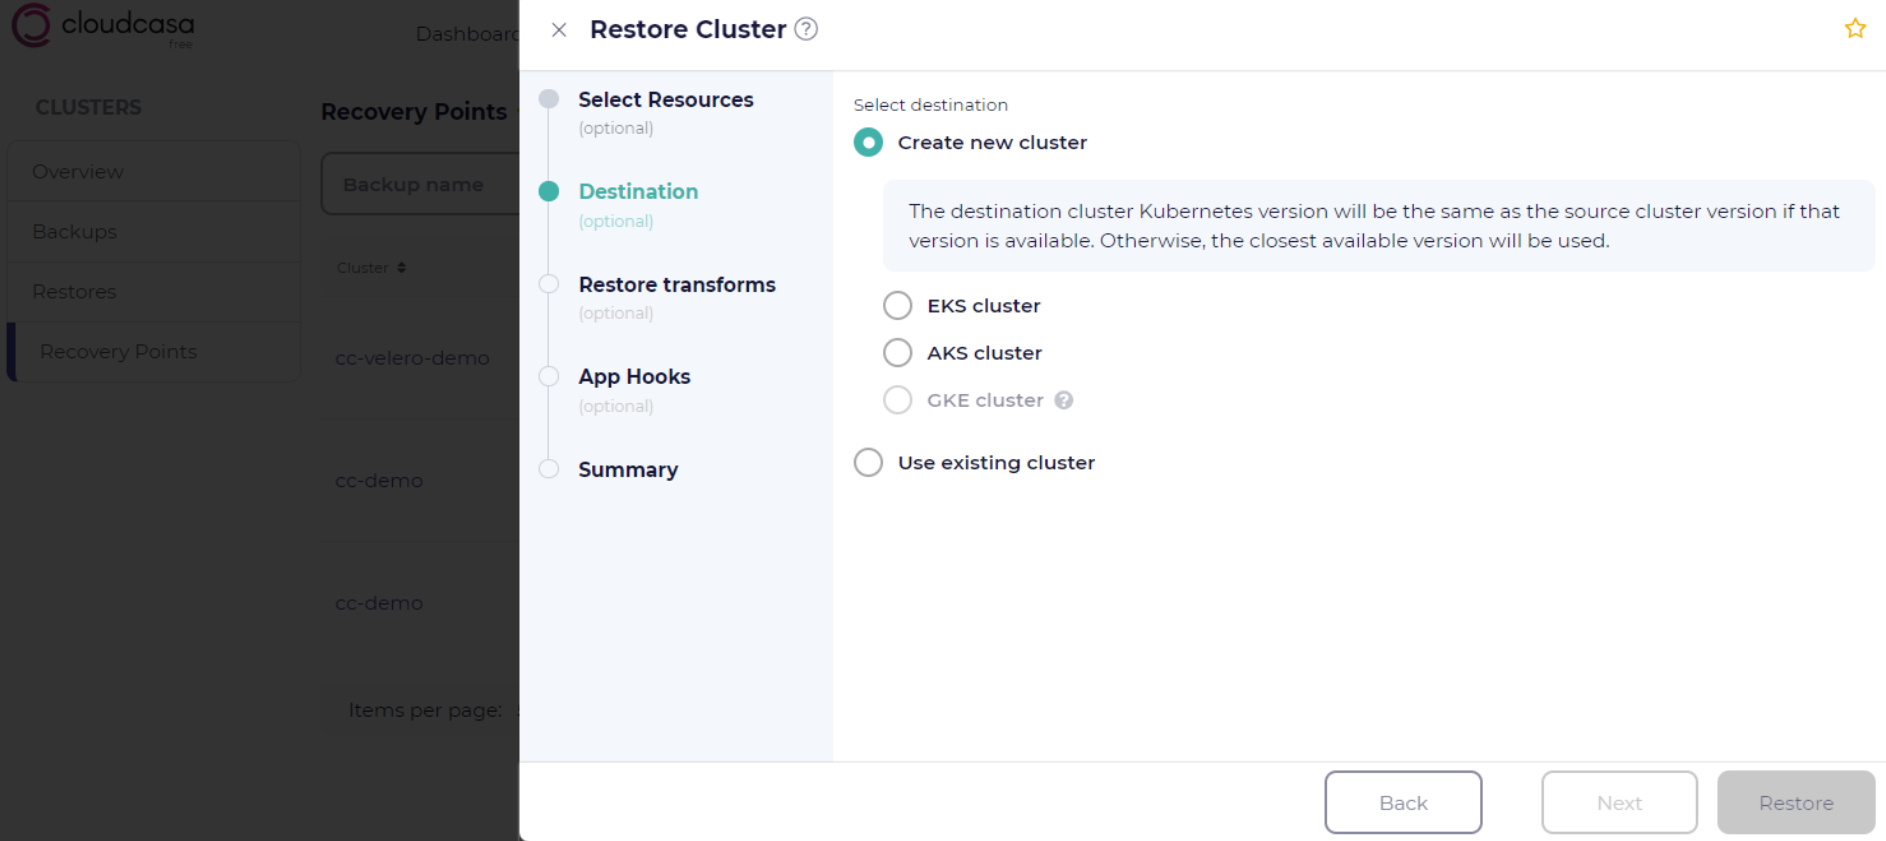
CloudCasa has the capability to automatically create new cloud-based Kubernetes clusters in AWS, Azure, or GCP as part of a restore, replication, or migration job, if you have registered appropriate cloud accounts. When defining a job, if the “Create new cluster” option is selected when choosing a destination cluster, you will be prompted to select a cluster type (EKS, AKS, or GKE), and the cloud account to use to create it.
See also
For information on registering cloud accounts with CloudCasa see: Cloud Accounts.
Tip
The option for each cloud cluster type will only be available if an appropriate cloud account has been registered with CloudCasa.
Once you select a cluster type and cloud account, a new section will open in the wizard with configuration options specific to that cloud provider (see below). If restoring or replicating to the same type of cluster as the source cluster, most creation options will be pre-filled with configuration data retrieved from the backup or source cluster.
During job execution, CloudCasa will first create the cluster and then proceed with restoring/replicating the Kubernetes resources and persistent volume data.
Creating an AWS EKS cluster
CloudCasa will initially prompt for the following parameters when you choose to create an EKS cluster on AWS:
Cloud Account: The linked AWS account that CloudCasa will create the new cluster in.
Replace the last recovered cluster instance with this job: Enabling this option will allow CloudCasa to overwrite (really remove and re-create) a cluster that was previously created by a restore operation. This may be useful in cases like dev/test scenarios where you want to repeatedly restore a cluster to a previous state. Note that CloudCasa will NOT overwrite a cluster that it did not previously create.
Advanced Options -> Do not clean up created cluster and dependent resources on error: This option is mainly for debugging cluster creation issues. It should not normally be enabled.
CloudCasa will then prompt for EKS-specific options in several wizard steps.
EKS Options
Cluster name: the name for the newly created cluster. This must be a name unique to the AWS region.
Region: the AWS region where this EKS cluster will be created.
Kubernetes version: The version of Kubernetes to use for the new EKS cluster. Only available versions will be displayed. The default is the Kubernetes version of the source cluster.
AWS Info Step - EKS
AWS user: the IAM user that the cluster will be created on behalf of. If provided, this user will have admin access to the cluster once the restore/replication is complete. This field is optional. If no IAM user is provided, you will need to manually grant appropriate access to the cluster using the AWS console or API after it has been created. Note that CloudCasa will set the authentication mode of the created cluster to “EKS API and ConfigMap” so that this is possible. If no IAM user is provided, a message will appear in the log indicating that you should manually add an IAM access entry and/or associate an OIDC identity provider.
Associate OIDC providers from backup: Allows you to associate one or more OIDC provider configurations from the source cluster with the new cluster. This option only appears if the backup contains OIDC provider configurations. OIDC provider configurations (if any) are backed up automatically whenever a backup is run on a EKS cluster in a linked AWS cloud account. The issuer URL for the OIDC provider must be publicly accessible. Note: You must be sure to restore or manually re-create the appropriate roles/clusterroles and rolebindings/clusterrolebindings to set up RBAC.
EKS Cluster IAM role: Kubernetes clusters managed by EKS will use this role to manage nodes, and the legacy Cloud Provider will use this role to create load balancers with Elastic Load Balancing (ELB). You can select an existing role or choose “Create new IAM role from backup” to restore the role used by the source cluster.
See also
For more information on EKS cluster IAM roles see: EKS cluster IAM role
Storage class encryption keys: This section appears only if the source cluster had storage classes defined where encryption was enabled and KMS key IDs were set in the storage class resources. Each such storage class will be listed here, allowing you to update the selected KMS key IDs. The default key for each storage class will be the AWS managed key “aws/ebs“.
Use customer managed key (CMK) for envelope encryption: EKS provides envelope encryption for all objects in the Kubernetes API. By default, AWS owns the keys used for envelope encryption. Enable this option to select an existing customer managed key (CMK) in KMS instead. By default, the KMS Key field will be populated with the key from the source cluster for EKS-to-EKS restores, replications, or migrations within the same account and region. You must supply a KMS Key for cross-region or cross-account restores. The selected key will be validated by CloudCasa.
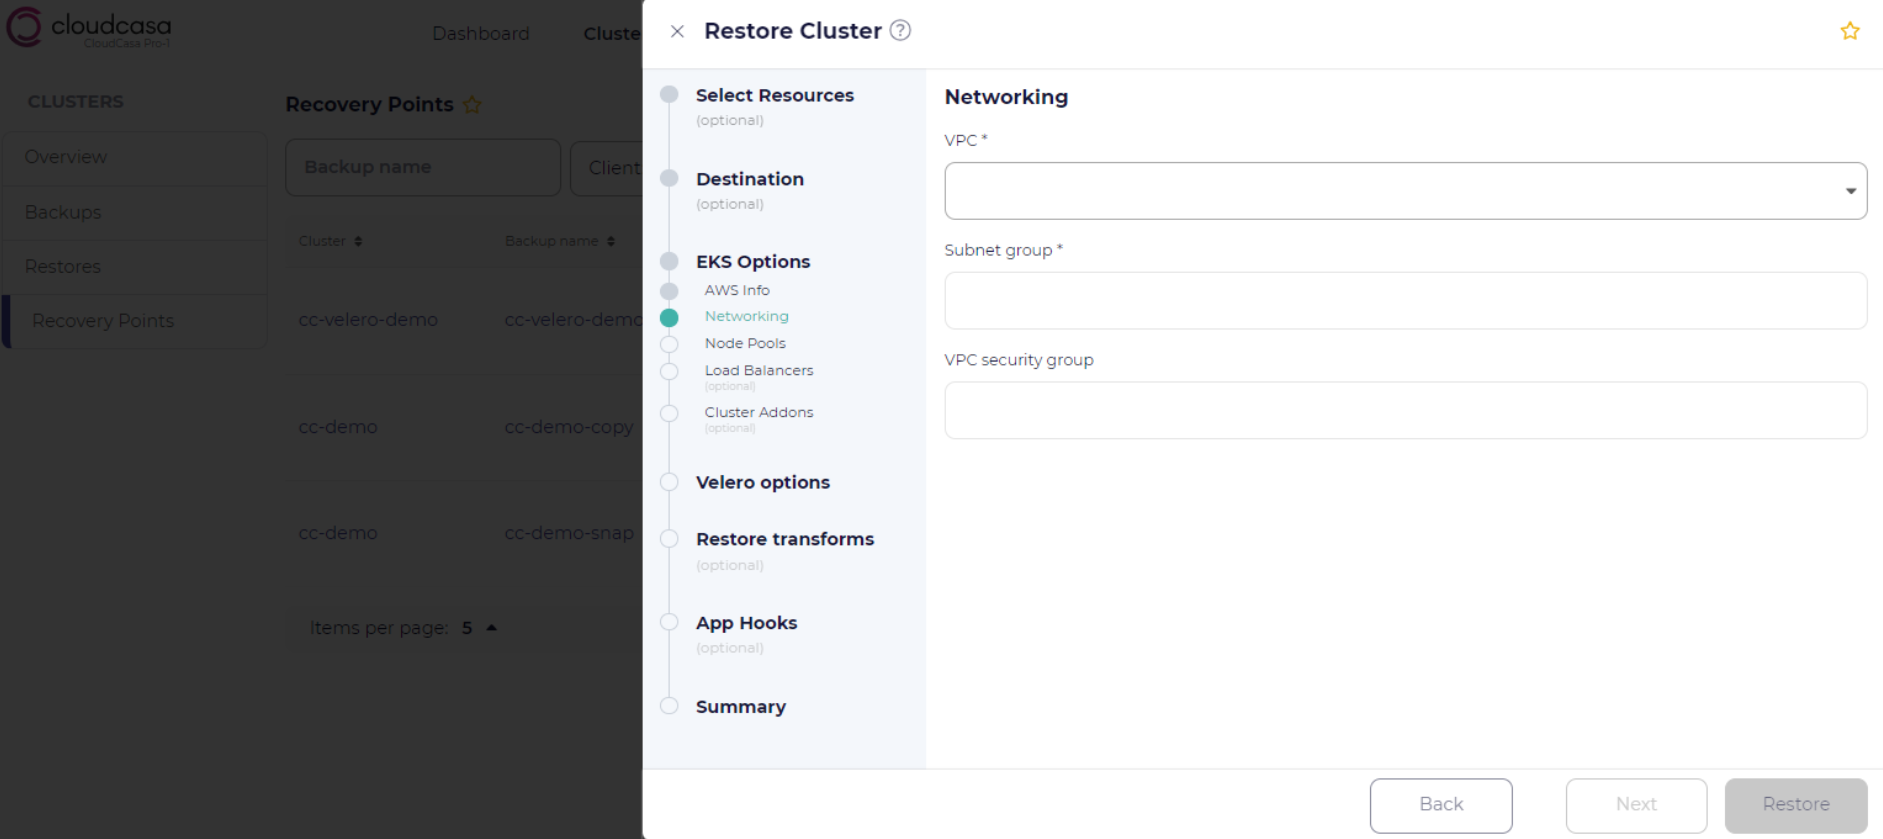
Networking Step - EKS
In the Networking section, you can set or modify VPC, subnet, and network access-related options.
If Re-create VPC from backup is selected, the VPC from the source cluster will be re-created, along with the listed Subnets and VPC security group. If the re-create option is not selected, you must select a VPC and Subnets for the cluster, and optionally select a VPC security group to be associated with the cluster. Leave the VPC security group field empty to allow Amazon EKS to create a new security group for you.
Under Network access, you can select from the options Public, Public and private, or Private. See the EKS documentation for more information.
Node Pools Step - EKS
Node Pools: In the Node Pools step you can select Customize node pools config to create or modify node pools. If not selected, the displayed node pool configuration from the source cluster will be used. When customizing the configuration of your node pools(s), the following parameters can be specified:
Node IAM role: the IAM role that will allow the cluster nodes to make calls to other AWS services.
See also
For information on how to find or create an EKS node IAM role see:
VM Size: the instance type to use for each node.
Root Disk Size in GiB: the root device disk size (in GiB) for each node. If not specified, this will default to 20 GB.
Worker node auto-scaling: the Minimum size, Maximum size, and Desired size for this node pool.
Create launch template from backup: This option will be displayed only if the source cluster used a launch template in the node pool definition. Enabling it allows you to restore the launch template, and also to modify the encryption option and the KMS key for each volume defined in the launch template.
Click + Add Node Pool to add additional node pools. Click the trash can icon to delete a node pool. At least one node pool must be defined.

Load Balancers Step - EKS
The Load Balancers step allows restore/migration of load balancers along with the cluster. You can select an existing role for AWS Load Balancer Controller IAM Role or create a new one by selecting “Create new IAM role from backup”. You can modify LB-related resources during restore by selecting Modify Service, Modify Ingress, and Modify TargetGroupBinding. You can also choose to restore Non-controller Provisioned Load Balancers by selecting them from the drop-down.
Cluster Addons Step - EKS
The Cluster Addons step allows you to select EKS addons to be installed, and to configure them. For each, you can select an existing IAM Role or choose Create IAM role from backup. If you choose to select an existing role, the default is “Inherit from node”, which will result in the IAM role for the node group being used.
Fargate Profile Step - EKS
The Fargate Profile step allows the restore of Fargate profiles when creating EKS clusters. Fargate profiles are backed up automatically whenever a backup is run on a EKS cluster in a linked AWS cloud account. In this step you are presented with a list of any Fargate profiles that were saved in the backup of the source cluster, and can select them for restore. You can also set the IAM role for pod execution and select subnets. Remove Fargate profile configurations to indicate that they should not be re-created during restore. After modifying the configurations, you can click “Reset to default” to revert the changes.
Notes
When creating an EKS cluster as part of a restore, migration, or replication job, CloudCasa will automatically install the CloudCasa agent on the new cluster. It will also automatically install the CSI snapshot controller using the EKS add-on provided by AWS.
Automatic installation of the CloudCasa agent on a private EKS cluster (i.e. a cluster with a non-public control plane endpoint) may not be possible, In this case, manual installation of the agent may be required. The system will wait up to 60 minutes for the agent to be installed, and for the cluster state to become active before proceeding. A message will be logged in the job activity log indicating that manual agent installation is necessary. This functionality should only be needed in special circumstances, since the agent it normally installed automatically.
EKS cluster access for the CloudCasa cross-account role is automatically removed after an EKS restore completes.
In most places where you are prompted to select an IAM role, you can choose “Create new IAM role from backup” to restore the role used by the source cluster. Of course, this option is only available if the role was saved from the source cluster, i.e. the source cluster was an EKS cluster in a linked AWS account. IAM roles and related policies are backed up automatically whenever a backup is run on a EKS cluster in a linked AWS cloud account. This includes IAM roles for cluster, node groups, addons, and load balancers.
CloudCasa will then restore the IAM role including all the inline and attached policies for the role. Note that the trust relationship policy for the role will also be re-created from the backup, but may require changes to the principal after restore to be valid. IAM role restore is available for “EKS Cluster IAM role” in the AWS Info page, for “Node IAM role” in the Node Pools configuration page, and “IAM Role” for individual cluster add-ons in the Cluster Addons page. It is also available for “Pod Execution Role” in the new Fargate Profile section.
Creating an Azure AKS cluster
CloudCasa will initially prompt for the following parameters when you choose to create an AKS cluster on Azure:
Cloud Account: The linked Azure account that CloudCasa will create the new cluster in.
Replace the last recovered cluster instance with this job: Enabling this option will allow CloudCasa to overwrite (really remove and re-create) a cluster that was previously created by a restore operation. This may be useful in cases like dev/test scenarios where you want to repeatedly restore a cluster to a previous state. Note that CloudCasa will NOT overwrite a cluster that it did not previously create.
CloudCasa will then prompt for AKS-specific options in several wizard steps.
AKS Options
CloudCasa will prompt for the following parameters when creating an AKS cluster on Azure:
Cluster name: the name for the newly created cluster.
Resource group: select an Azure resource group that will be associated with the cluster.
Region: the Azure region where this AKS cluster will be created.
Kubernetes version: the Kubernetes version for the new cluster, from the list of available versions.
Credentials Step - AKS
Client ID: the client ID credential to use when creating the AKS cluster.
Client Secret: the client secret credential used when creating the AKS cluster.
Admin password: Admin user account password to use on Windows node VMs.

Networking Step - AKS
Networking gives you the option to either restore a saved VNet (if available) by selecting Restore VNet and choosing the subnets to restore, or to choose networking type Kubenet or Azure CNI along with the appropriate options for each. For Azure CNI, you will be prompted to choose a Virtual Network from the list and optionally supply Kubernetes service address range, Kubernetes DNS service IP address, and Docker bridge CIDR. If you select the option Private cluster, you will also be given the ability to select a Private DNS zone and to Disable public FQDN. See the AKS documentation for more information.
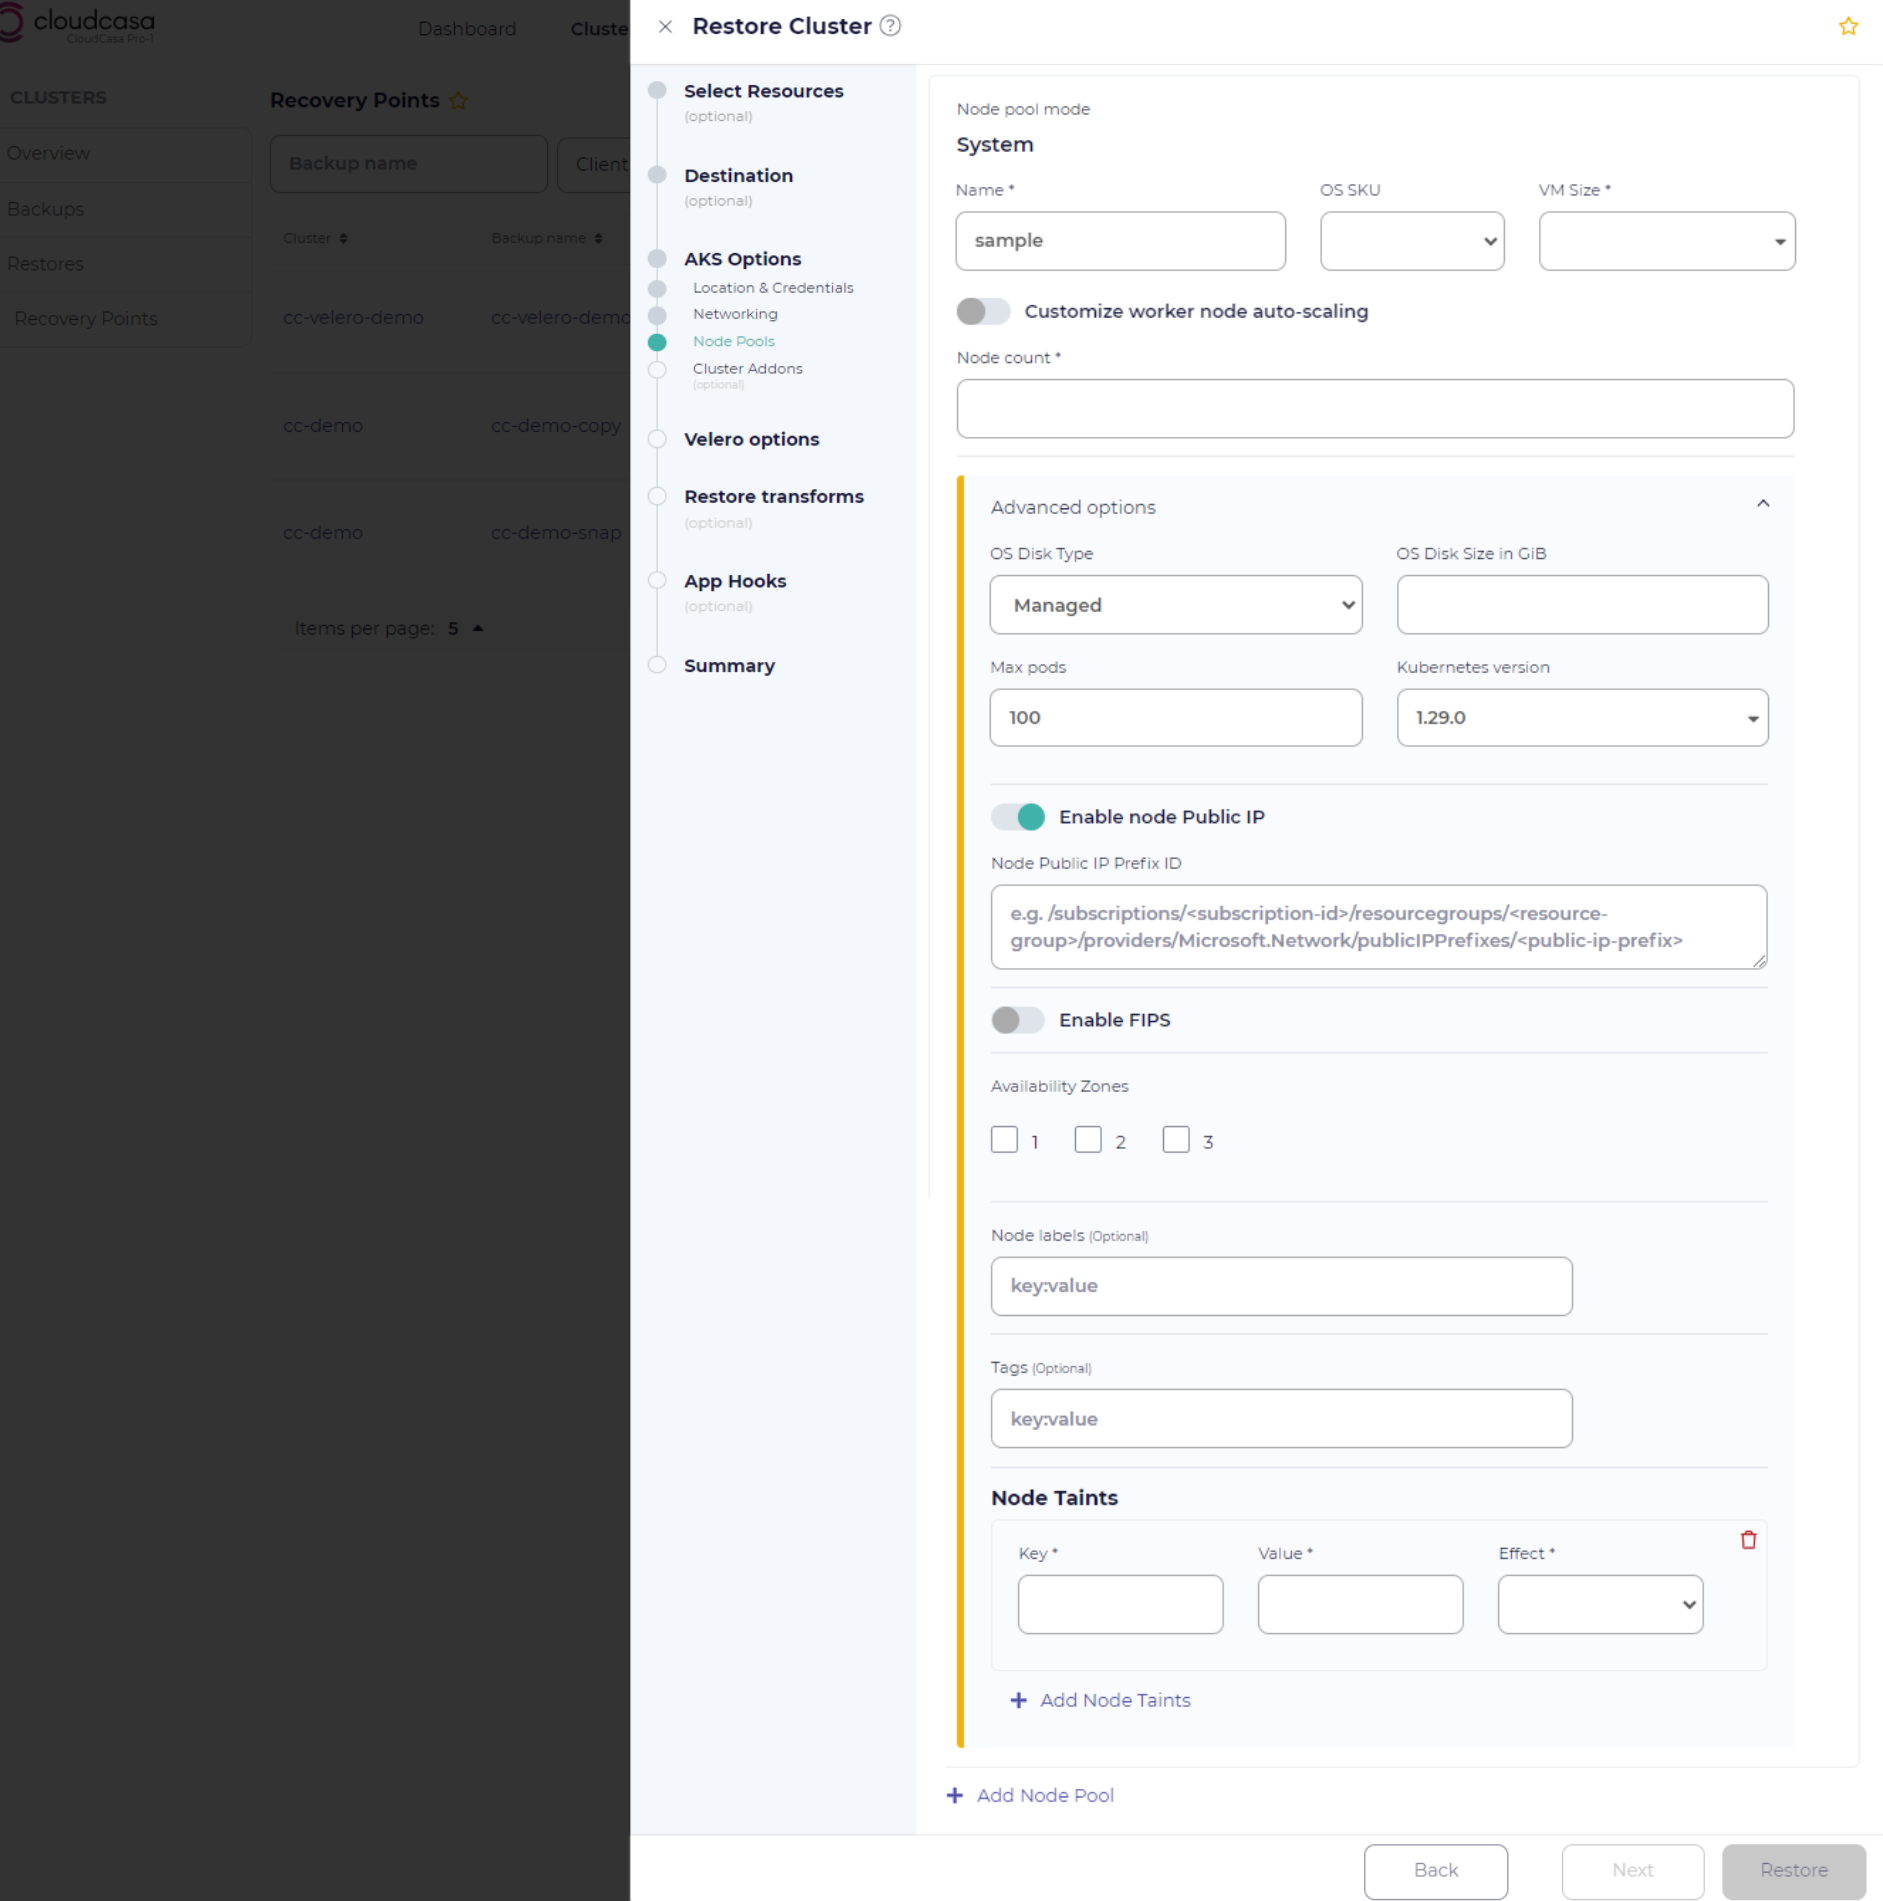
Node Pools Step - AKS
Select the Customize node pools config option in order to set custom parameters for each AKS node pool. Click Add Node Pool to create additional node pools. The following parameters can be set:
Node pool mode: can be set to either “system”, to host critical system pods, or “user” for general applications. If there is only one node pool, its mode will always be set to “system”.
Name: The name to assign to the node pool.
OS SKU: the OS for the node pool, currently either Ubuntu or Azure Linux.
VM Size: the VM size to be used for each node.
Node count: the number of nodes to be created for this pool.
Auto-scaling: select Customize worker node auto-scaling to replace the fixed Node count with the auto-scaling properties Minimum size, Maximum size, and Desired size.
Advanced Options: Opening the Node Pool Advanced options section will allow you to modify several less frequently used node pool options:
- OS Disk Type
The OS disk type to be used for nodes in the pool. Can be “Ephemeral” or “Managed”.
- Max pods
The maximum number of pods deployable to nodes in this pool.
- Kubernetes version
The Kubernetes version to use for nodes in this pool.
- Enable node Public IP
Enable VMSS node public IP. Default is false.
- Enable FIPS
Create a node pool that provides FIPS 140-2 cryptographic modules. Default is false.
- Availability Zones
The availability zone(s) where agent nodes will be placed.
- Node labels
The node labels for the node pool, specified as key:value pairs.
- Tags
Tags for the node pool, specified as key:value pairs.
- Node Taints
The node taints for the node pool. Click + Add Node Taints to add taints.
Cluster Addons Step - AKS
The Cluster Addons step allows you to select optional cluster Addons, such as Azure Policy, Container monitoring, etc.
Creating a Google GKE cluster
CloudCasa will initially prompt for the following parameters when you choose to create a GKE cluster on GCP:
Cloud Account: The linked GCP account that CloudCasa will create the new cluster in.
Replace the last recovered cluster instance with this job: Enabling this option will allow CloudCasa to overwrite (really remove and re-create) a cluster that was previously created by a restore operation. This may be useful in cases like dev/test scenarios where you want to repeatedly restore a cluster to a previous state. Note that CloudCasa will NOT overwrite a cluster that it did not previously create.
CloudCasa will then prompt for GKE-specific options in several wizard steps.
GKE Options
Cluster name: the name for the cluster that is to be created.
Location: Select type Zonal or Regional, and then select the Zone or Region from the drop-down. Note that loading the available zones or regions may take a few seconds. Next select the desired Node locations from the list.
Kubernetes version: Select your desired Kubernetes version from the list of available versions.
Networking Step - GKE
Select Network and Subnet from the lists in the drop-downs.
If the source and destination clusters are both GKE, a Restore VPC option may be present. Enabling this will re-create the saved VPC with selected subnets (the cluster subnet is always selected).
Node Pools Step - GKE
Multiple node pools can be created by clicking Add Node Pool. For each node pool, you can enter the following parameters:
Select VM Size for the pool nodes.
Enter Root Disk Size in GiB for the pool nodes.
Enter Node count for the pool or select Customize worker node auto-scaling and enter Minimum size, Maximum size, and Desired size.
If the source and destination clusters are both GKE, the saved node pool information will be displayed. It can be modified by selecting the Customize node pools config option.
Cluster Addons Step - GKE
Select any desired add-ons for the cluster, such as HTTP Load Balancing, Horizontal Pod Autoscaling, etc.
See also
For more information on GKE configuration options see: The Google Kubernetes Engine Documentation