Storage
The Backup Storage page allows you to define, view, and edit storage targets for backups and migration/replication jobs. From the menu bar, go to Configuration/Storage.
Migration and replication jobs can use storage defined here as transient storage.
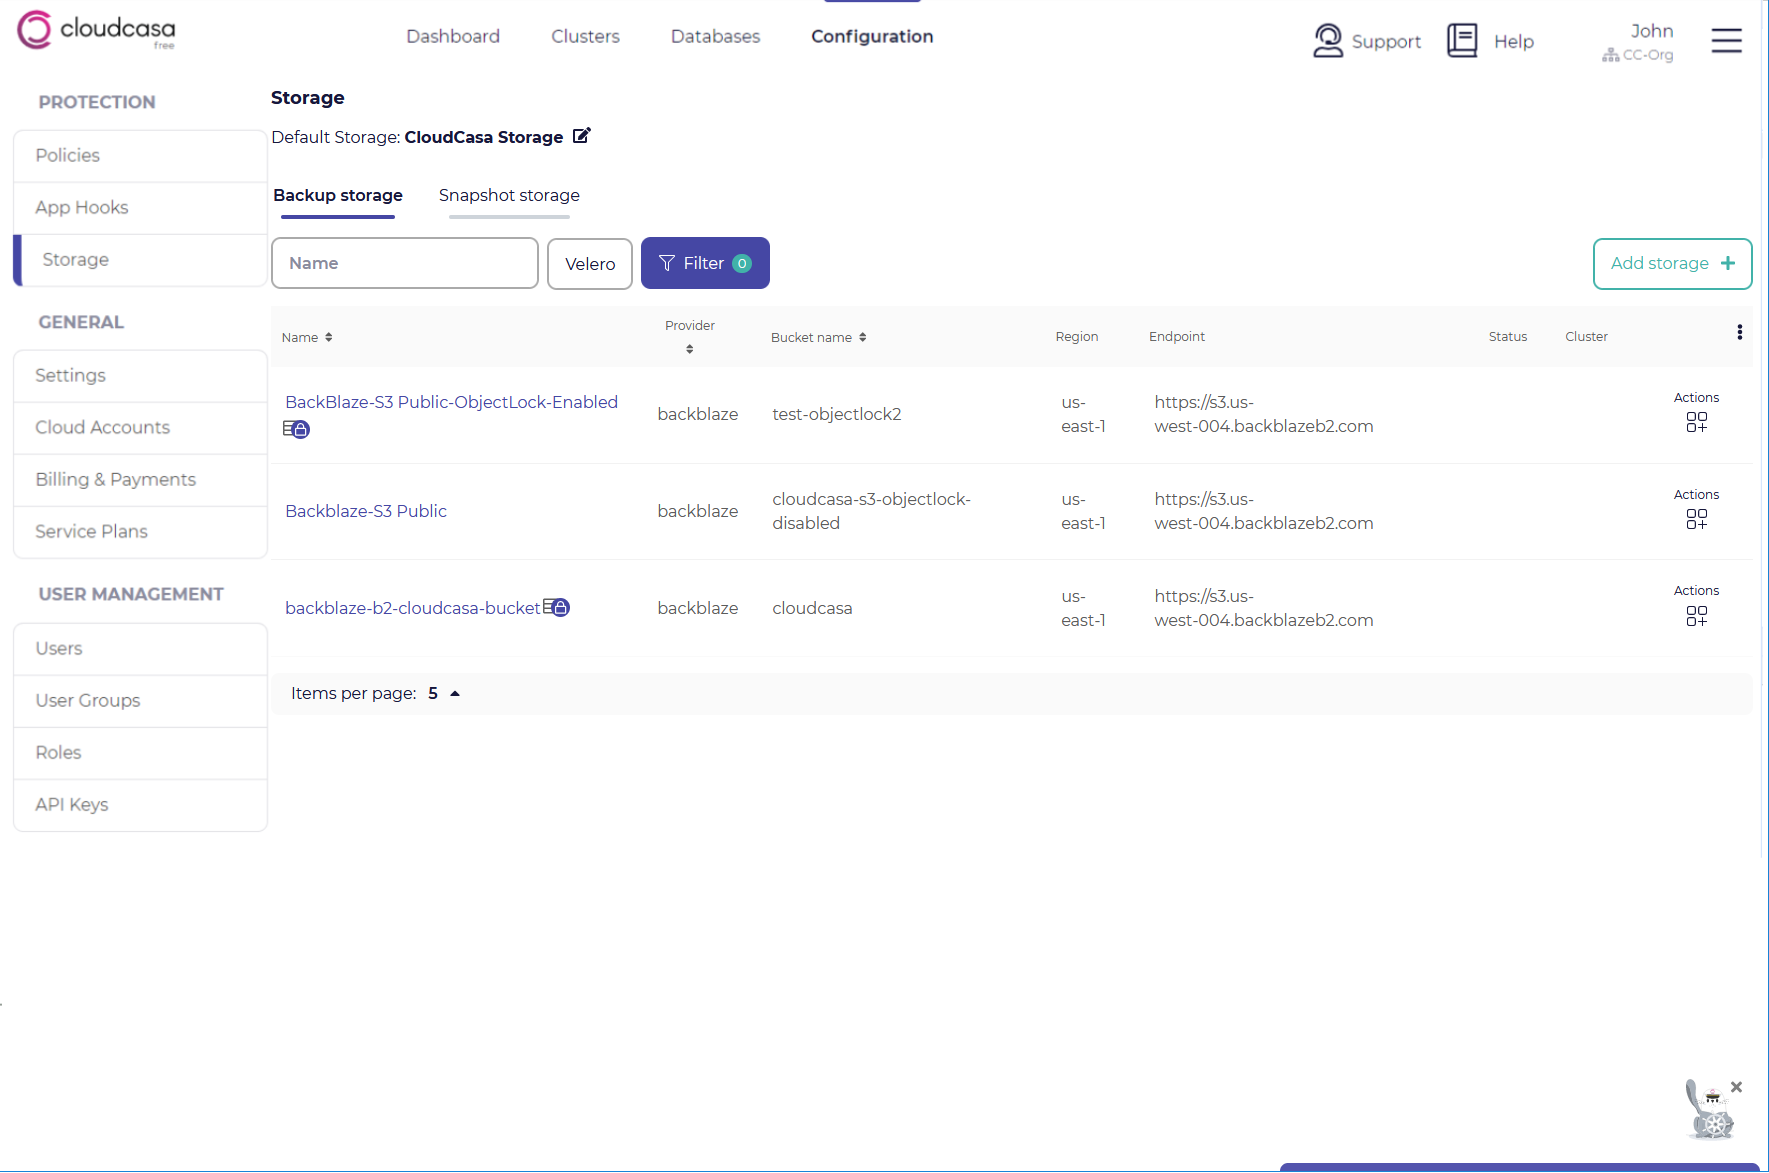
Two tabs are available on the Backup Storage page, Object storage and File storage. The Object storage tab lists user-defined object storage and the File storage tab lists user-defined NFS or SMB storage for backups.
Storage for CloudCasa backups
CloudCasa supports most types of object storage that are compatible with the Amazon S3 API or Microsoft Azure Blob storage as user-supplied storage. Cloud object storage reached through AWS PrivateLink, Azure Private Link, or GCP Private Service Connect is fully supported as a backup destination. So is storage located on private networks, as long as it is reachable from your cluster(s).
Any NFSv3 or NFSv4.x storage that is reachable from your clusters and that your clusters are permitted to access can also be used as backup storage. Similarly, any SMB storage reachable from your clusters can be used as well.
Storage locations are global and can be shared across multiple clusters.
A global “Default storage” location for your organization can be set at the top of the page. The default is inherited by all clusters and backup jobs unless overridden. It can also be configured at cluster and backup level as well.
Also, Note that a change in Storage target for a backup will trigger a full backup the next time backups are run.
Adding object storage for CloudCasa backups
In the Storage page, select the Object storage tab and click Add storage +.
Select CloudCasa (the default) as the Storage Type. You must specify the following fields:
- Is your storage isolated/restricted from Internet access?
Choose Yes if your storage is not reachable via the public Internet.
- Proxy cluster
If the storage is marked as isolated, you must choose a cluster with an active CloudCasa agent which will be responsible for performing management operations on the storage. The storage must be reachable from this cluster.
You can also optionally add a proxy cluster for non-isolated storage if you wish for maintenance operations to be run from a local cluster, but this should not normally be necessary. By default, service operations will be run from CloudCasa’s cloud infrastructure.

Click Next.
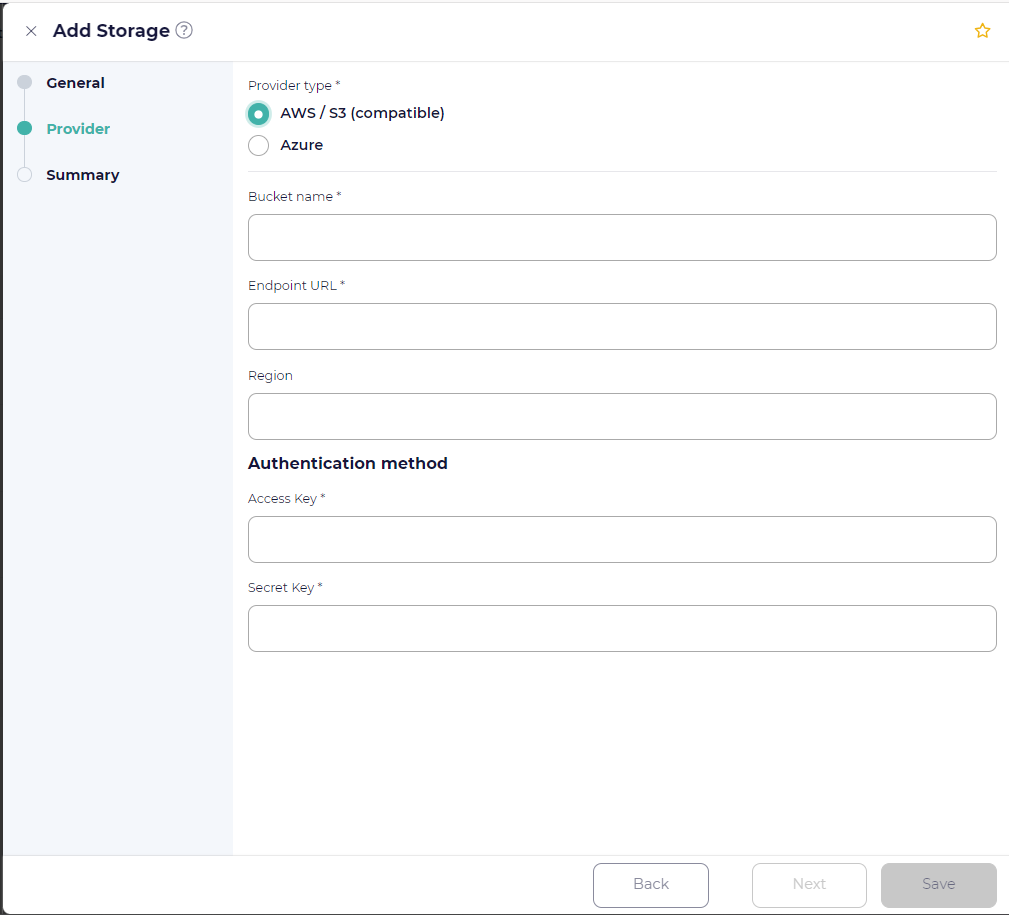
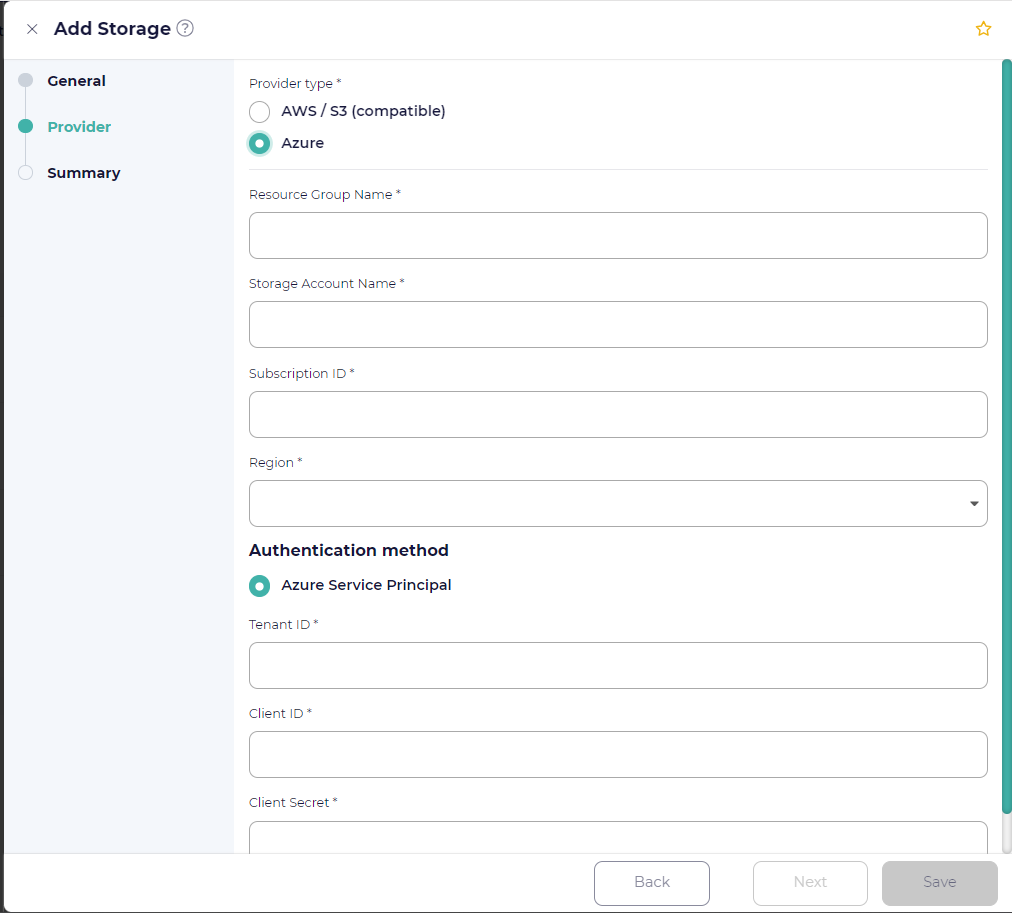
In the Provider step, choose the Provider Type and fill in the provider-specific options:
- Amazon / S3 compatible
Select this option for Amazon Simple Storage Service (S3) or any S3 compatible object storage. The following options are available:
- Bucket name
Enter the bucket name of the S3 storage.
- Endpoint
Enter the regional endpoint URL for the S3-compatible storage. It is often of the format
https:://service-code.region-code.provider.come.g. https://s3.ap-south-1.amazonaws.com, https://s3.eu-west-2.wasabisys.com, or https://nyc3.digitaloceanspaces.com.- Region
Enter the region under which the S3 bucket is created (may or may not be required for non-AWS buckets).
For UpCloud storage, region must be left as empty. For Google cloud storage, region must be set to “auto”.
- Disable TLS certificate validation
It is generally not recommended to enable this setting. Enabling it allows connections to the storage endpoint even if the server certificate is self-signed or expired, or if the certificate domain name does not match the host name.
- Access key
Enter the access key of the S3 storage.
- Secret key
Enter the secret key of the S3 storage.
- Azure
Select this option for Azure Blob Storage. The following options are available:
- Azure Cloud
Select Public (the default) for storage in the public Azure cloud or Government for storage in Azure Government Cloud. Azure Government Cloud is managed through portal.azure.us instead of portal.azure.com for Azure Public Cloud. If you don’t know which Azure cloud you are using, chances are you should select Public.
- Resource Group Name
Enter the resource group name that will be used to hold all resources for the storage.
- Storage Account Name
Enter the name of the storage account created under the same resource group.
- Subscription ID
Enter the subscription ID of the Microsoft Azure plan that you have purchased.
- Region
Enter the region name associated with the resource group.
- Tenant ID
Enter the tenant ID associated with the Microsoft Azure subscription.
- Client ID
Enter the unique Client (Application) ID assigned by Microsoft Azure when the application was registered.
- Client Secret
Enter a valid client secret of the Service Principal.
Click Next
In the Summary step, you will see a summary of the above, and will need to define:
- Name
Display name for the Storage location.
Click Save.
Using Immutable Object Storage
CloudCasa supports enabling immutability on user-supplied object stores. This works with both S3-compatible storage (i.e. Object Lock) and Azure Blob Storage (i.e. Immutable Storage). CloudCasa automatically detects if Object Lock/immutability is enabled. When properly configured, a lock icon will appear next to the storage in the Configuration/Storage page. When a backup runs to the storage, the actual retention period will be set to the maximum of the bucket’s retention period and the backup job’s policy retention period. Note that only specific storage settings are supported, as specified below. If the storage configuration is incorrect, CloudCasa will not allow you to add the storage.
Prerequisites for S3 storage buckets with Object Lock:
Object Lock enabled
Default retention enabled
Default retention mode = Compliance
Retention period set to a valid period
Prerequisites for Azure blob storage with immutability:
Version-level immutability enabled at storage account level
Version-level immutability policy defined and set as locked
Note that support for immutable storage is provided only with paid service plans.
Adding NFS storage for CloudCasa backups
Before adding the NFS storage, please make sure you understand the permission requirements, as described here: NFS Configuration.
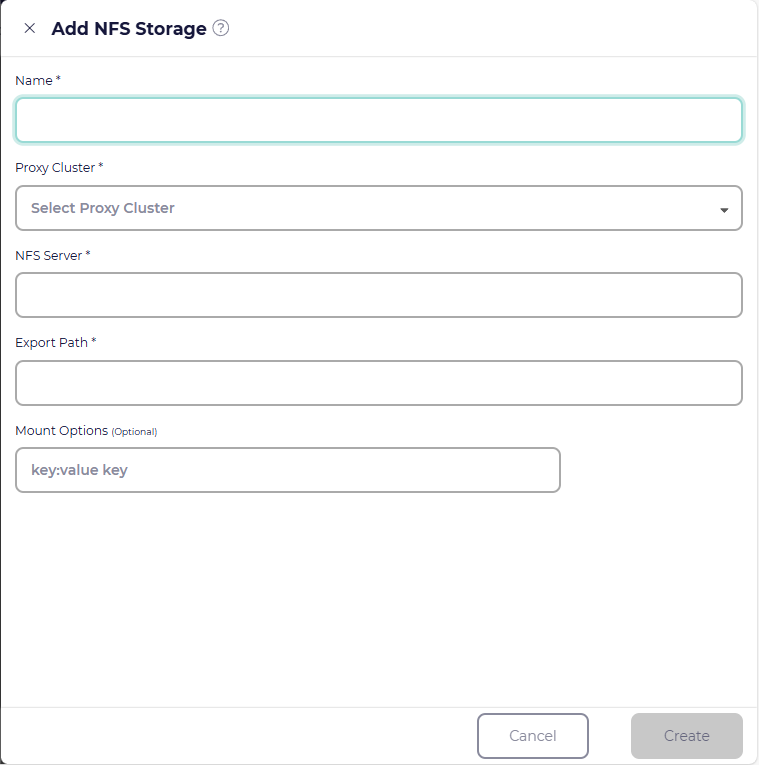
In the Storage page, select the File storage tab, click Add storage +, and select NFS type. You can then specify the following fields:
- Name
Display name for the storage location. You can set this to whatever unique value you wish.
- Proxy Cluster
Choose a cluster with an active CloudCasa agent which will be responsible for performing management operations on the storage. The storage must be reachable from this cluster. Typically, this would be one of the clusters that you will back up to the storage in question.
- NFS Server
The DNS name or IP address of the NFS server exporting the share.
- Export Path
The directory path exported by the NFS server.
- Mount Options (optional)
The NFS mount options to use. Multiple options can be entered one at a time or in a space-separated list with “:” or “=” separating key-value pairs (e.g. “rw hard vers=4).
- Advanced options ► Customize client pod parameters
CloudCasa starts a pod on the cluster where NFS storage is being accessed for backups and other operations. This section allows you to set custom configuration for this pod, such as CPU Request, CPU Limit, Memory Request, and Memory Limit parameters as well as labels, annotations, and many other things.
See also
See Advanced Gateway Configuration for more information.
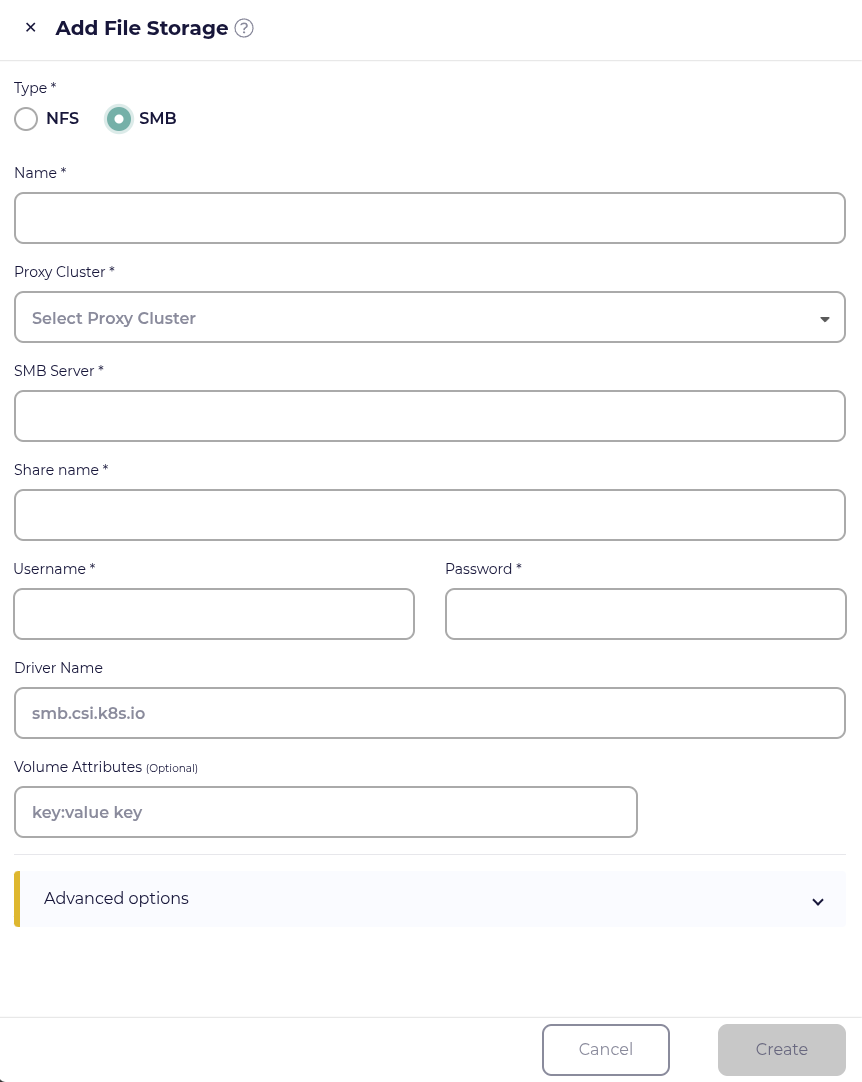
Adding SMB storage for CloudCasa backups
In the Storage page, select the File storage tab, click Add storage +, and select SMB type. You can then specify the following fields:
- Name
Display name for the storage location. You can set this to whatever unique value you wish.
- Proxy Cluster
Choose a cluster with an active CloudCasa agent which will be responsible for performing management operations on the storage. The storage must be reachable from this cluster. Typically, this would be one of the clusters that you will back up to the storage in question.
- SMB Server
The DNS name or IP address of the SMB server exporting the share.
- Share name
The share exported by the SMB server.
- User name/Password
Credentials needed to access the share.
- Driver name (optional)
By default, CloudCasa uses the driver “smb.csi.k8s.io” to create the PVC pointing to the SMB share. If you want to use a different driver, set it here.
- Volume attributes (optional)
The SMB volume attributes to use. Multiple attributes can be entered one at a time or in a space-separated list with “:” or “=” separating key-value pairs.
- Advanced options ► Customize client pod parameters
CloudCasa starts a pod on the cluster where SMB storage is being accessed for backups and other operations. This section allows you to set custom configuration for this pod, such as CPU Request, CPU Limit, Memory Request, and Memory Limit parameters as well as labels, annotations, and many other things.
See also
See Advanced Gateway Configuration for more information.