Cluster Replication Wizard
The Cluster Replication Wizard allows you to create and edit Kubernetes replication jobs. Replication jobs allow you to replicate an entire cluster or part of a cluster on a continuing periodic basis. Typically, they might be used for maintaining a DR or hot standby cluster, or for periodically creating a dev/test replica of a production cluster.
The wizard consists of several steps, not all of which will appear in all cases. You can jump back and forth between steps by clicking on the step names on the left-hand side of the wizard.
Defining a Kubernetes replication job
Source cluster step
In the Cluster step of the wizard you must select the replication source from the list of active clusters. Note that depending on how you reached the wizard, the source cluster may already be selected for you. In that case, the wizard will open on the next step. After choosing a cluster, click Next.
Selections step
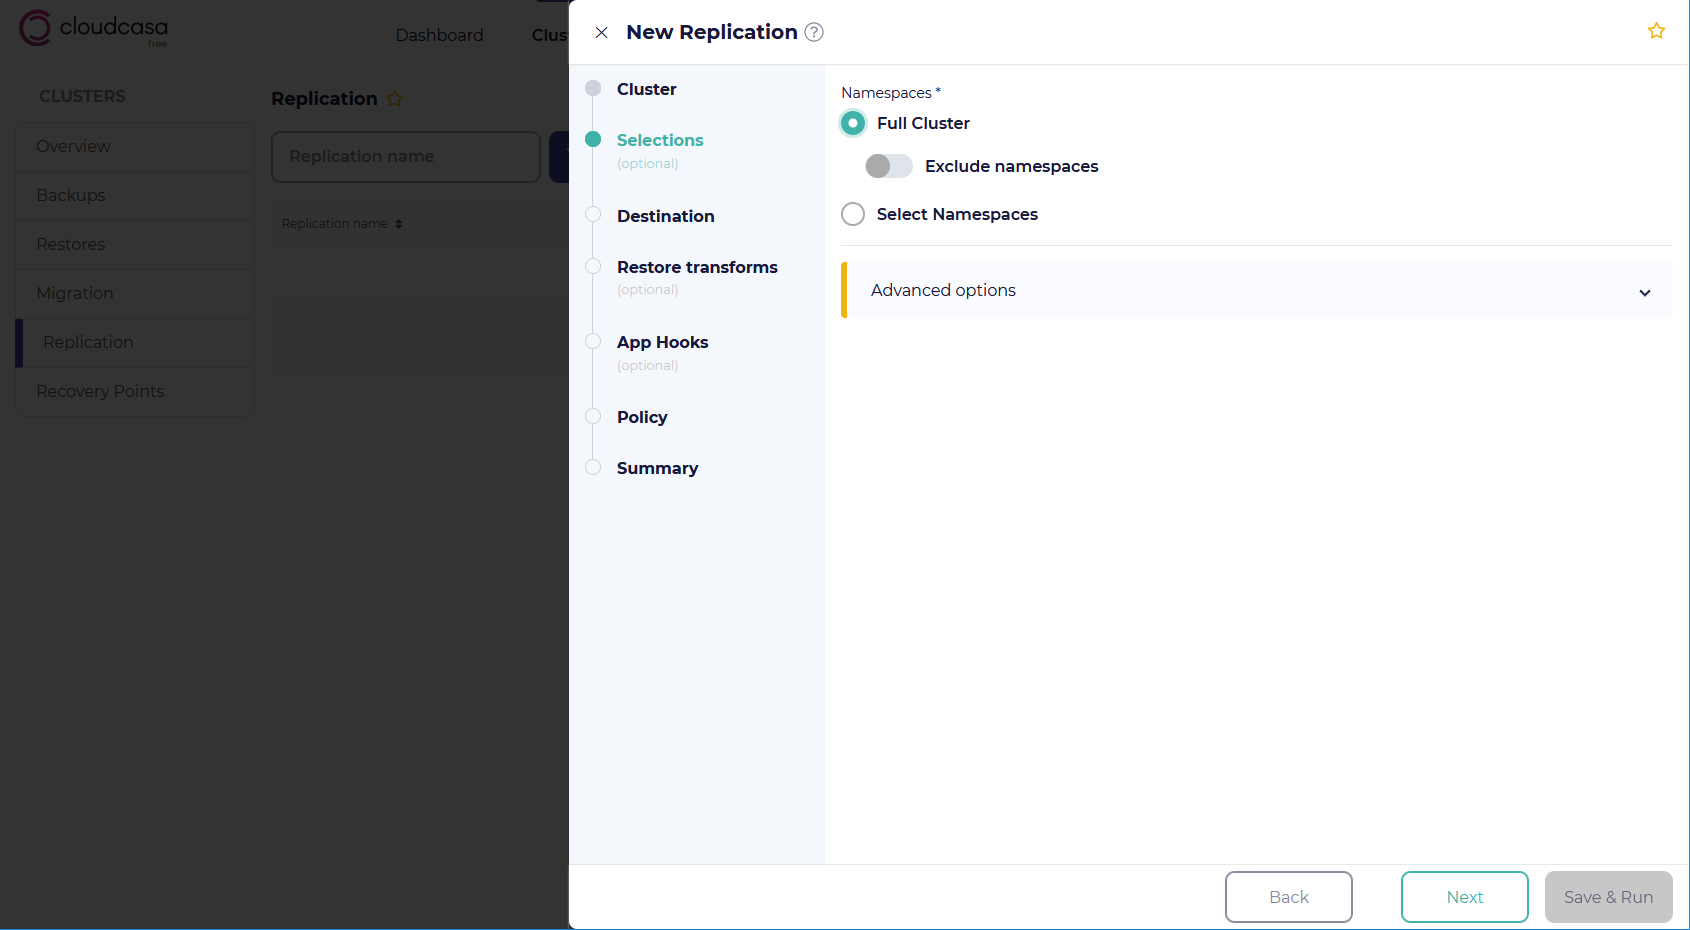
In the Selections step, you choose exactly what will be copied to the destination cluster using the following options:
- Namespaces
Select either Full Cluster or Select Namespaces. Choosing Select Namespaces will prompt you to select the specific namespaces to include in the copy operation. Choosing Full Cluster (the default) will include all namespaces. Choosing Full Cluster and then Exclude namespaces will allow you to exclude specific namespaces.
- Include all cluster-scoped resources
If enabled, the system will attempt to replicate all cluster-scoped resources. Otherwise, only cluster-scoped resources associated with selected resources (e.g. PVs associated with PVCs) will be replicated. Full cluster replications always copy all cluster-scoped resources, but when only selected namespaces are being replicated this is optional. This option defaults to off. This option is only shown if full cluster replication has not been selected (i.e. namespaces are selected or excluded).
- Advanced Options
Opening the Advanced options section will allow you to set the following options:
- Select resource types (optional)
Allows you to copy only specific Kubernetes resources types.
- Select labels (optional)
Enter key-value pairs to specify the labels for the objects that you wish to copy in the cluster.
Tip
If you enter multiple label selectors separated by spaces in the Select Labels field, the relationship between them is assumed to be logical AND. So if you enter
a:b c:d, it means thatamust equalbANDcmust equaldin order for the selector to match.CloudCasa will also allow you to enter a single key with multiple comma-separated values, and the relationship between these is assumed to be logical OR. So entering
a:b,cmeans thatamust equalbORc. These can be combined, so enteringa:b,c x:ymeans thatamust equalbORcANDxmust equaly. That’s equivalent to(a == b || a == c) && x == y. Note that OR is not currently possible between different keys.- Snapshot PVs before backup where possible
Create snapshots of PVs that support them, and copy from the snapshots for consistency. This should generally be left enabled (the default) unless you experience problems with snapshot creation.
- Back up directly from all PVs not snapshotted
All PVs not snapshotted will be copied directly. This should generally be left enabled (the default) unless you do not wish to copy volumes which do not support snapshots.
- Configure backup method by storage class
Allows you to manually select the copy method for each storage class defined in your cluster. The available methods are:
Read data from snapshot
Read data from PVC
Read data from underlying host volume
Skip
- Destination storage for copy
This allows you to select the temporary storage used during replication. Choose one of the following options:
Inherit from cluster preferences - Use the default storage destination for the cluster.
CloudCasa Storage - Use CloudCasa Storage. Select the cloud provider and region.
User-provided Storage - Select one of the user-defined object or NFS storage endpoints that you registered in the Storage page.
- Concurrent PVs
Select the maximum number of PVs that will be copied at once. The allowed range is between 1 and 16. The default is 2 PVs.
- Total concurrent files
Sets the number of files that will be copied concurrently across ALL PVs.
- Max transfer rate per PV
Specifies the maximum transfer rate for the data transfer between each PV and the destination storage during the replication job, in MB per second. Leave this field blank to set no limit. The default value is blank for “Unlimited”.
- Data mover pod timeout
Time that the agent will wait for the data mover pod to start. If using snapshots, the timer will start once snapshot PVCs are bound. This should only need to be changed in special cases, for example when copying Longhorn volumes using snapshots.
- Data mover memory limit
Controls the maximum amount of memory that the data mover pod will be permitted to allocate during the replication process. This can be set between 512 MB and 8 GB. Higher values may be required if large settings for PV and/or file parallelism are used. By default it is set to 1024 MB.
- Exclude unattached PVCs
By default, CloudCasa will include unattached PVCs in the copy operation. Enabling this option will cause unattached PVCs to be excluded from the copy. Be aware that there is currently no option to restore unattached PVCs to the replication target.
- Enable storage class mapping for PV snapshots mounted during backup
This option allows you to use different storage classes when PV snapshots are mounted for copying the data off during replication operations. This may be useful, for example, to indicate to your storage system that less replicas or different parameters should be used for these transient volumes than for normal production volumes. By default, the storage class of the original source volume will be used.
Note: You must specify a storage class that uses the same CSI driver as that used by the original storage class in order for mounting of snapshots to succeed. The new storage class should only differ in parameters such as number of replicas.
- Azure Files Snapshot Restore Method (for AKS clusters only)
This option controls which method is used to mount snapshots of Azure Files PVs created on the source cluster during replication. It appears only for AKS source clusters with Kubernetes version 1.29 or greater. The choices are Auto, CSI Driver, and CloudCasa Azure Files Mover. Auto is the default. Note that with AKS versions prior to 1.29 the CSI Driver method is not available, so CloudCasa Azure Files Mover will always be used.
See also
See AzureFile (CSI) for additional information.
- Configure data mover node selection
Controls which nodes data mover pods will be run on, either by storage class (By storage class option) or for the whole job (Job level option). Available node affinity options are:
PVC Node - Mover pod will run on the same node where the PVC is located.
Not PVC Node - Mover pod will run on any node except the one where the PVC is located. This is especially useful for backup of XFS filesystems.
None - Affinity will not be specified when creating the mover pod.
Auto - Let CloudCasa choose. Generally, “PVC Node” will be used for LIVE backup methods and “None” for others. (Default)
- CSI snapshot timeout
The amount of time the agent will wait for a PV snapshot to become ready when mounting. The default is 10 minutes, which should be adequate for most applications. PVs using certain storage systems such as Longhorn may require this to be increased.
Destination cluster step
In the Destination step, select the destination cluster for the replication job. You can choose a pre-existing cluster, or you can choose to create a new EKS, AKS, or GKE cluster in a registered cloud account. If you choose an existing cluster, you must select specific namespaces for replication. These namespaces will be deleted and re-created on the destination cluster with each run of the replication job. If you choose to create a new cluster, the entire new cluster will be deleted and re-created with each run of the replication job.
See also
For more information about cluster creation, see Creating Clusters With CloudCasa.
Restore transforms
In the Restore Transforms step, you can choose transformations that will be applied on the destination cluster. These include:
- Rename Namespaces
Enabling this option will allow you to rename replicated namespaces by either adding a prefix and/or suffix, or applying a mapping.
- Add prefix/postfix
Add a prefix or postfix to the replicated namespace(s). For example, if there were namespaces “sales” and “services” in the source cluster and you add a suffix, “-dev”, to the namespaces, the replication job will create the namespaces “sales-dev” and “services-dev” in the destination cluster.
- Set new names
This allows you to create a set of mappings from old namespace names to new namespace names. Names left unmapped will be replicated unchanged.
- Change Storage Classes
Gives you the option to remap storage classes on the destination cluster. When selected, the UI will display the storage classes used by PVs/PVCs on the source cluster, and allow you to enter new storage classes to substitute for each on the destination cluster. By default, the same storage classes will be used.
Make sure that a destination storage class is compatible with the source storage class with regards to properties such as supported access modes.
- Preserve node ports
If selected, automatically assigned node ports for services in the source cluster will be preserved in the destination cluster. Make sure that these ports are available in the destination cluster.
Note that manually assigned node ports are not affected by this option and are always preserved.
- Overwrite existing resources
Enabling this option will cause the replication job to overwrite existing Kubernetes resources. It will do this by attempting to update existing resources to match the corresponding resources from the source cluster. This update is subject to resource update semantics. For example, pod resources don’t allow updates, but most others do. Any resources that cannot be updated will generate a warning in the log.
Note that for PVCs, the contents of existing PVCs will be modified if this option is selected.
- VM Options -> Clear MAC address(es)
Specifies that MAC addresses for restored VMs should be cleared and new addresses should be assigned. This defaults to on. Disable it to preserve the saved MAC addresses for restored VMs. Do this only if you are sure that it will not result in duplicate MAC addresses on your network.
- VM options -> Generate new firmware UUID
Specifies that new firmware UUIDs should be generated for restored VMs. This defaults to off.
- VM Options -> Run Strategy
This field controls whether and how restored VMs are started after replication. You can select any valid Run Strategy option or select “Use strategy from backup” to retain the run strategy for each VM from the backup. If you are uncertain, we recommend selecting “Halted” and booting VMs manually after restore.
See also
See the VM Restore reference for more information.
Policy step
In the Policy step, you can choose a policy for the replication job. Policies define the schedules under which jobs will run. You can see your policies under Configuration/Policies. If you need to define a new policy, you can click Add policy + at the top right. If you don’t select a policy, your replication job won’t be scheduled automatically, but can be run manually on an ad-hoc basis. Note that the retention and SafeLock fields in a policy definition will be ignored for replication jobs.
Click Next to proceed.
See also
For more information about policies, see Policies.
App Hooks step
In the App Hooks step you can choose to add source cluster pre and post-replication application hooks, and destination cluster post-replication application hooks.
See also
For more information about App Hooks, see App Hooks.
Summary step
Review the Summary of the replication job settings to verify that they are correct. In this step you must also enter the following:
- Replication name
You must assign a name for the replication job.
By default, new replication jobs will be run immediately. You can toggle off the Run now option if you would rather simply save the job and run it later.
When you’re done, click Save or Save & Run.
Your new replication job is defined! If you selected the “Run now” option, it will start to execute immediately. If not, you can run it manually later from the Cluster/Replication page or the cluster dashboard.