Adding, Editing, & Deleting Clusters
Adding a Cluster
Before performing any backup, restore, replication, or migration operations on a cluster, you first need to register it with CloudCasa and install a CloudCasa agent on it. If you have linked one or more AWS, Azure, or GCP cloud accounts, CloudCasa will assist you by automatically discovering EKS, AKS, and GKE clusters in the linked accounts and providing options for you to automatically install the agent on them.
You can add a cluster to CloudCasa by navigating to the Clusters/Overview page and clicking Add cluster. If the cluster has been discovered from a linked cloud account, you should instead configure it by selecting Edit. You can also configure discovered clusters by navigating to Configuration/Cloud Accounts, selecting the cloud account, and choosing the Edit option from the Clusters tab.
See also
For more information about clients supported by CloudCasa, see Compatibility and Supported Clients.
Tip
The CloudCasa agent requires outbound connectivity to the CloudCasa service for control traffic, and also requires outbound connectivity to the selected backup storage to perform backup & restore operations. See Network Connectivity for details.
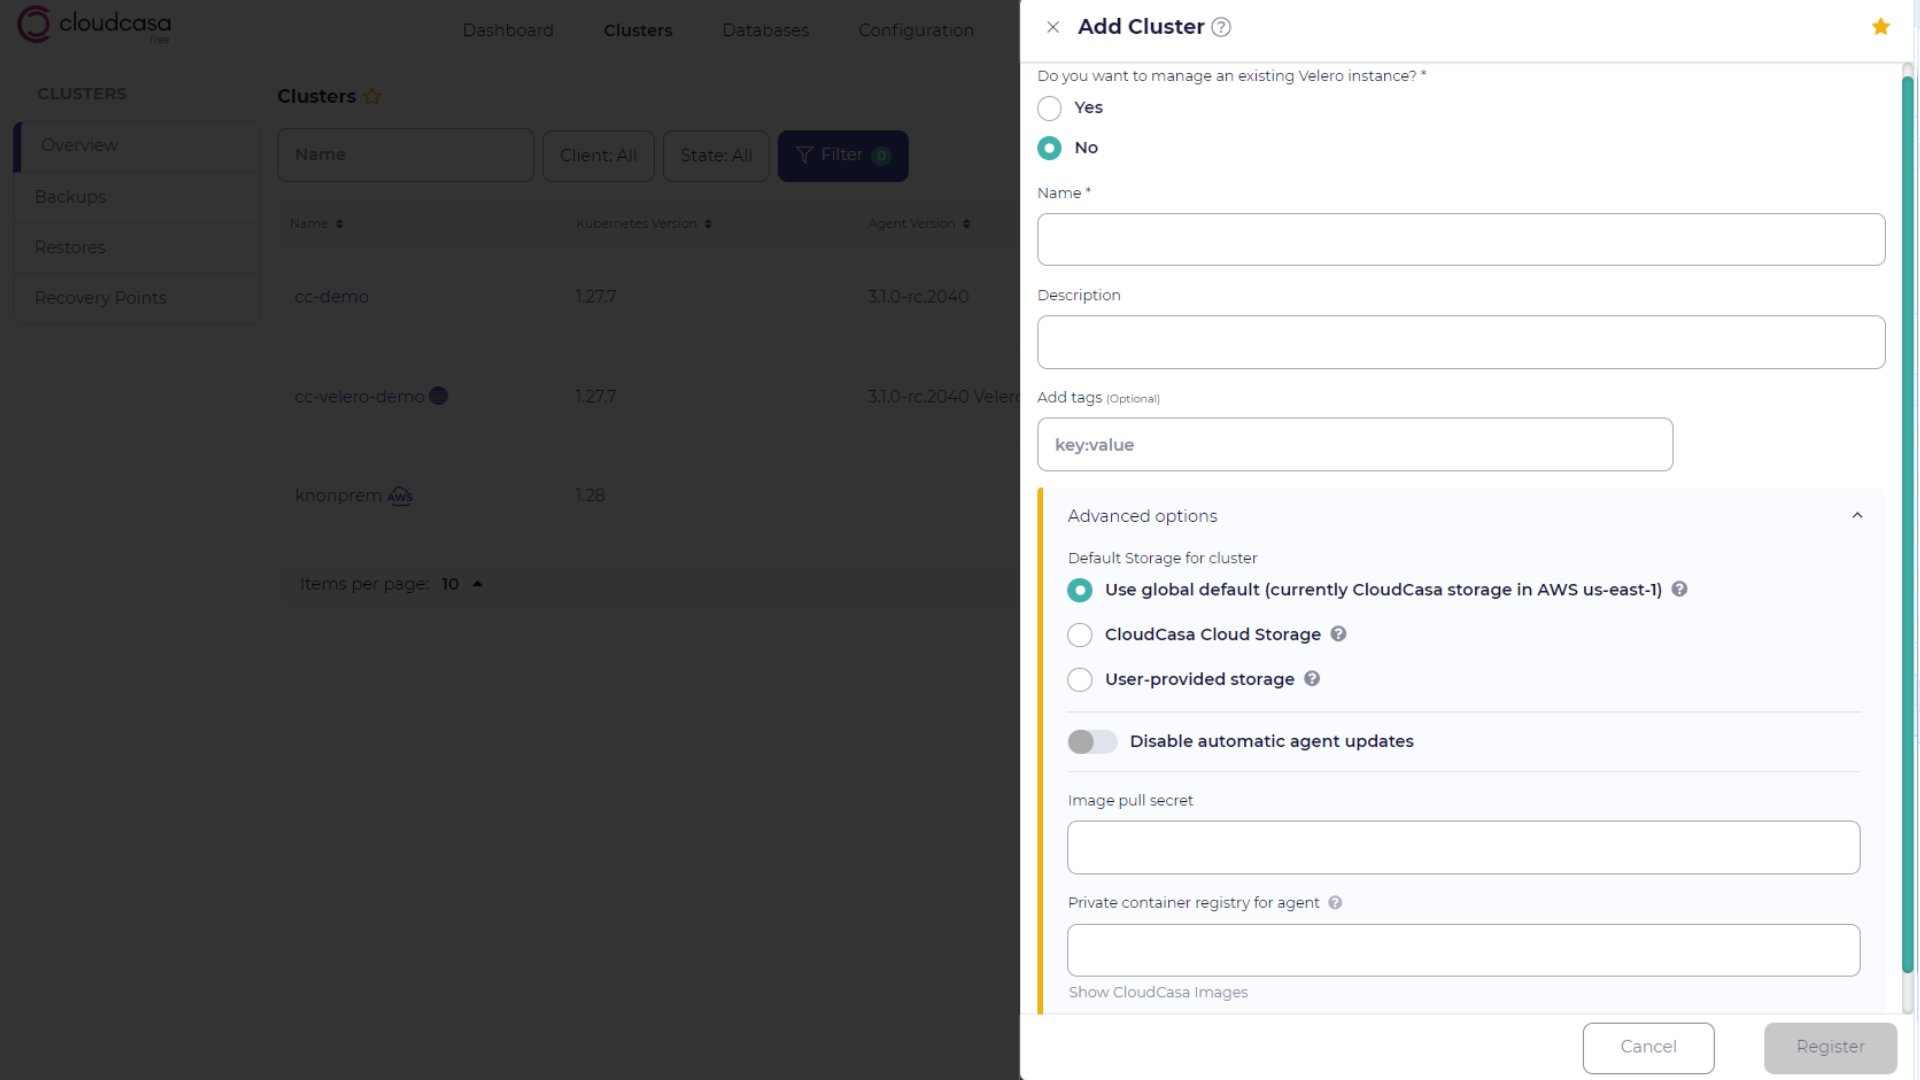
Take the following steps to add a cluster in your CloudCasa organization:
Fill in the following fields:
- Name
Enter a name for the cluster.
- Description (optional)
Enter a description for the cluster.
- Add tags (optional)
Enter the key-value pairs for the tags of the cluster. For example,
team:marketing.- Enable CloudCasa DR
Enable CloudCasa DR features for this cluster. This allows for configuration of low-RTO/low-RPO DR failover from one cluster to another using external storage-based replication. This option must be enabled in order to use a cluster as a CloudCasa DR source or destination cluster. Note that supported storage is required.
See also
For more information, see the CloudCasa DR Setup Guide.
Note
There are additional charges associated with this option.
- Advanced options ► Default Storage for cluster (optional)
Select the default backup storage location for this cluster by choosing one of the following:
Use global default - Use the default storage set for your organization (default)
CloudCasa Storage - Use CloudCasa storage in the selected cloud and region
My Storage - Use user-provided backup storage.
Note that this default location can be overridden on a per-backup basis.
- Advanced options ► Compression
Inherit from global settings (default) - If enabled, compression settings from this cluster are taken from the organization’s global default. Disable to set compression settings locally for this cluster.
Enable/Disable - If enabled, you can select between: Balanced (the default), Optimize for speed, Optimize for memory usage, and Optimize for data reduction.
- Advanced options ► Maximum Concurrent Jobs
Controls the number of concurrent jobs that are allowed to run on the cluster. The limit is set to 1 by default, but can be changed to any value between 1 and 32. Jobs that exceed this limit or that cannot run concurrently with already executing jobs will be queued.
Limitations on concurrent job execution:
Full cluster backups, delete backup jobs, and restore jobs with the option “Include all cluster-scoped resources” selected run exclusively. No other jobs are allowed to run while any one of these is running.
Two jobs that back up or restore the same namespace cannot run at the same time.
The snapshot phase of backup jobs is serialized, but this phase is relatively short.
Note that for higher values, you may need to adjust CPU/memory limits for the containers “kubeagent” and “backup helper”. See below for details. Higher CSI snapshot timeouts may also be required when running concurrent jobs.
- Advanced options ► Kubelet pods directory
This option was added to support the new Read data from underlying host volume backup method. It allows you to set the base path where CloudCasa will look for pod PV data when that method has been selected for a PV backup operation on the cluster. The path from which pod PVC data will be read is based on this path, and is fully specified as: <kubelet-pods-directory>/<pod-id>/volumes/*/<pvc-id>/mount. If this parameter is not configured it defaults to “/var/lib/kubelet/pods”, which should be correct for most clusters.
- Advanced options ► Disable automatic agent updates
Enabling this option will prevent the agent from automatically updating itself when an update is available. This is generally not recommended.
Note that this option is enabled by default when Private container registry for agent is set. See details below.
- Advanced options ► Image pull secret
The name of the image pull secret in the cloudcasa-io namespace that will be used to pull CloudCasa agent images from the registry. Defining this may be necessary if you wish to pull agent images from your own registry (see below), or if you wish to authenticate to a public registry to prevent throttling of pull requests. By default, no secret will be used.
Note: This option is only valid for agents installed using the kubectl method. Setting it will have no effect on agents installed using the EKS add-on or via other methods.
Note: When setting or changing the image pull secret for a cluster that already has the agent installed, the agent must first be removed, the secret created in the cloudcasa-io namespace and configured here, and then the agent re-installed.
See also
For more information about defining secrets for private registry access, see the Kubernetes Documentation.
- Advanced options ► Private container registry for agent
The private container registry from which CloudCasa agent container images will be pulled. For example,
12345678910.dkr.ecr.us-east-1.amazonaws.com. Defining this is necessary only if this cluster cannot pull images from the default public container registry (e.g. ACR or Docker Hub). Note that agent automatic updates are disabled by default if a private container registry is defined. Enabling automatic agent updates is not recommended when using a private container registry unless new agent images will always be made immediately available in the private registry, such as when the registry is configured as a caching proxy or when new images are fetched automatically through other means.Clicking on the “show images” option under this field will display a list of the images that will need to be present in the private repo. You should transfer these from the appropriate public repo (e.g. ACR or Docker Hub) before proceeding, and arrange to update them in the future as necessary.
Note: This option is only valid for agents installed using the kubectl and Helm chart methods. When using the Helm chart method, you must also set the image.repository parameter. Setting it will have no effect on agents installed using the EKS add-on or via other methods.
- Advanced options ► Customize agent installation parameters
This section allows you to set custom installation parameters for the Kubeagent, Kubeagent Manager, and Backup Helper components of the CloudCasa agent using YAML. This includes container CPU Request, CPU Limit, Memory Request, and Memory Limit parameters as well as labels, annotations, and many other things.
See also
See Advanced Agent Configuration for more information.
Note that when editing you can select YAML Editor to edit the YAML directly or Guided YAML Editor to start a wizard that prompts you with choices.
Click Register.
A dialog will open showing you different installation options for CloudCasa’s lightweight agent. Depending on the type of cluster you are registering, you may see options for automatic installation and manual installation using different methods (kubectl, Helm, etc.). To install using kubectl, you can simply copy the displayed command and run it on a host where kubeconfig is set up to connect to the cluster being registered. Click Close when you are done.
See also
See Agent Installation for more details on available agent installation methods.
The pane then changes, showing the cluster ID and status. Install and Permissions icons appear at the top.
Click on the Permissions icon to manage cluster permission settings. This allows you to create an ACL to grant specific permissions to the cluster to users or groups, for all or selected namespaces. Note that permissions assigned at the cluster level add to permissions the user or group may have from user groups and roles.
Click the Install icon to re-open the Install Agent dialog to help you install or re-install the agent.
Click Done to close the pane. Ensure that you can see the new cluster in the list and that its status has changed to ACTIVE before attempting backup and restore operations.
Editing a cluster
You can edit the configuration for an existing cluster by going to the Clusters/Overview page and selecting the Edit action in the Clusters list, or by clicking the Edit button in the cluster dashboard. The Edit Cluster pane is then displayed, showing the cluster ID and status, and allowing you to make changes to cluster settings.
When editing a cluster, additional options appear that are not available when initially adding a cluster.
- Advanced options ► Configure data mover persistent cache
This option allows you to enable persistent caching of index data by the CloudCasa agent’s data mover, using dynamically created PVCs.
Normally the CloudCasa agent data mover pod downloads index data from the target storage into temporary local storage before then loading it into memory. This data is then deleted when the data mover terminates. Persisting this data instead can, in certain cases, speed up backups and reduce network traffic.
Persistent cache is disabled by default, but can be enabled on a per-namespace basis. To configure it, you need to select a storage class which will be used to create the cache PVCs dynamically. The cache size must then be configured for each namespace separately. For each configured namespace, the data mover will then create a PVC using the selected storage class, and use it for persistent index data caching.
Enabling persistent caching is not necessary in most cases, but it can help to improve backup performance in certain specific scenarios, particularly when backing up PVCs containing a large number of files that change frequently.
- Advanced options ► Configure volume snapshot classes
Define which volume snapshot classes should be used for which storage classes when creating snapshots. Normally CloudCasa will create appropriate volume snapshot classes automatically, but with some CSI drivers this is not possible because the volume snapshot classes must contain cluster-specific configuration parameters. This option allows you to manually specify which volume snapshot classes should be used in these cases.
See also
See Volume snapshot class selection for more information.
For descriptions of all other cluster options, see Adding a Cluster above.
Click Save to close the Edit Cluster pane.
Removing a cluster
In the cluster list, click Remove and follow the instructions. If jobs are defined for the cluster, you may be prompted to remove those first.
Attention
After removing the cluster, manually remove any PV snapshots that were created by CloudCasa as part of the cluster’s Snapshot backups.
After the cluster is removed from CloudCasa, you should take the appropriate steps to uninstall the CloudCasa agent, depending on how it was installed.
See also
See the appropriate page in the Agent Installation section for uninstall instructions.