CloudCasa DR Setup Guide
CloudCasa DR provides a disaster recovery solution for top-tier applications with very low RTOs and RPOs (think seconds or minutes instead of hours), using reliable, efficient, storage-based volume replication that you likely already have.
Step 1 - Configure Clusters
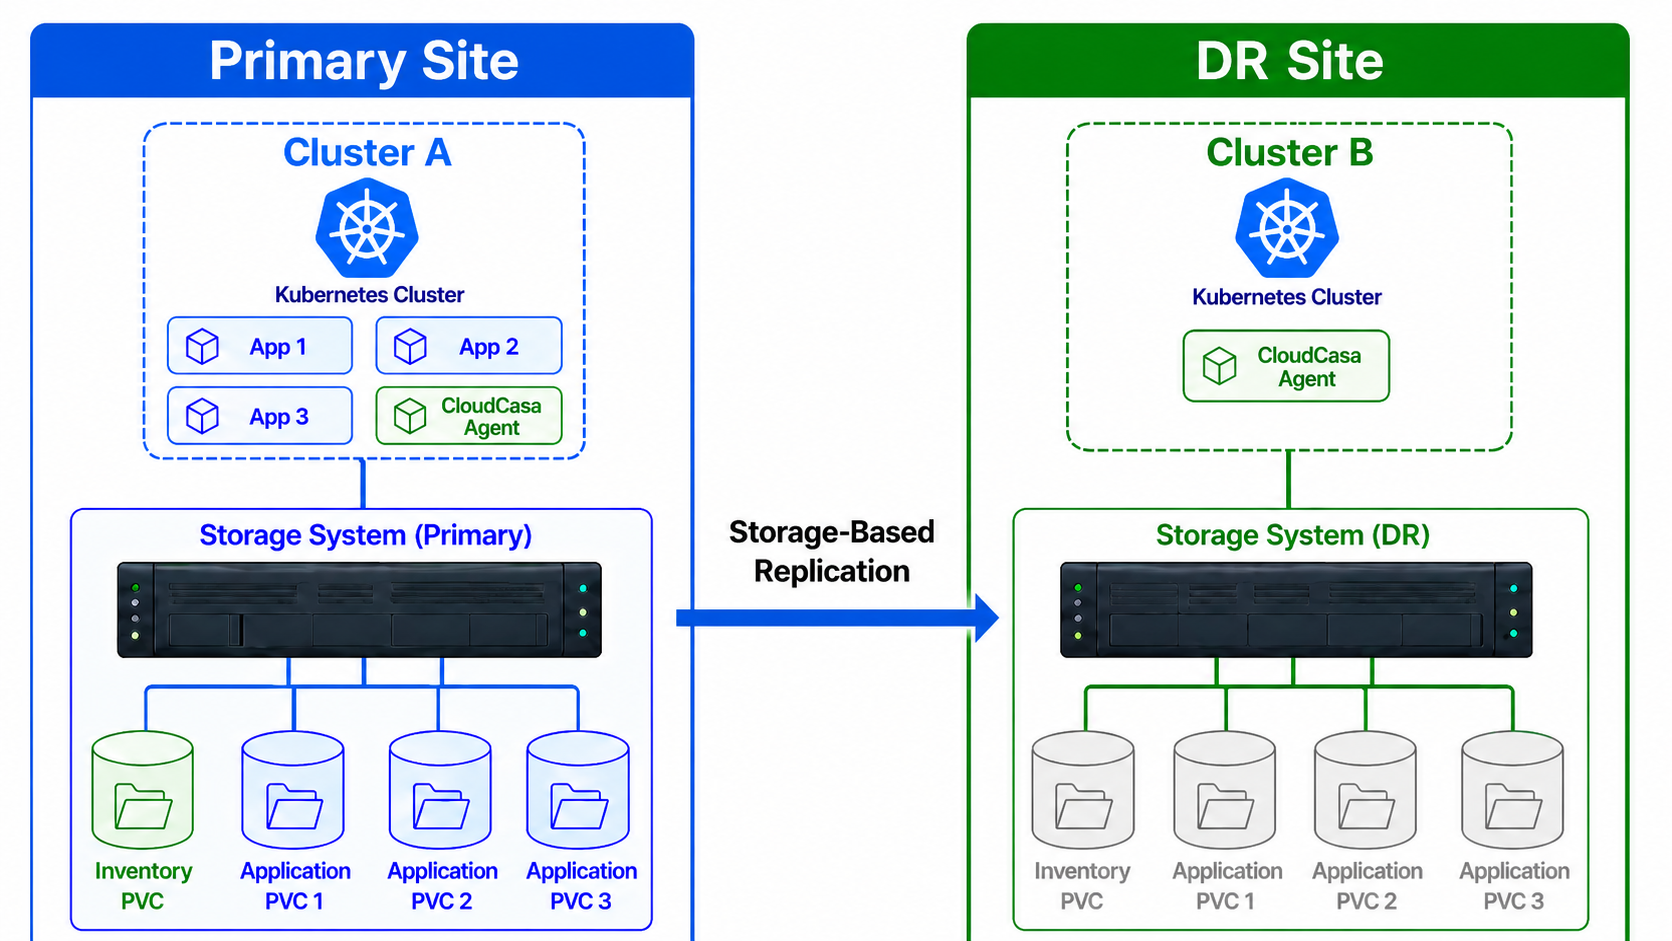
To make use of the CloudCasa DR feature, users need two clusters (source and target clusters), both connected to supported storage systems. Workloads running on the source cluster must use PVCs backed by storage volumes that are configured for remote replication. All of the storage volumes must be accessible from both clusters, the primaries on the source side and the remote replicas on the destination side.
To enable CloudCasa DR functionality, register the source and target clusters (if they have not been registered already) and enable the option “Enable CloudCasa DR”. You will then see the clusters listed on both the Clusters/Overview page and the DR/Clusters page.
See also
For more information on configuring clusters, see Adding a Cluster.
Step 2 - Configure Storage Systems
Next, configure the storage systems used by the source and target clusters on the DR/Storage Systems page by clicking on Add Storage System. At present, CloudCasa DR supports HPE Alletra Storage 9000 and Alletra Storage MP B10000 storage arrays using HPE Remote Copy, and SUSE Storage/Longhorn using Longhorn Disaster Recovery Volumes. You will need to provide a name for the storage system and enter any other required details.
After adding a new storage system, CloudCasa will open another dialog prompting you to validate the connection to it. For this, you need to choose a proxy cluster. This can be any cluster that has network access to the storage system and which can be used to perform the validation. Typically, this should be one of the clusters that normally uses the storage, and for which you will be configuring CloudCasa DR.
Once a storage system has been added, you will see it listed on the DR/Storage Systems page. The details shown will include version information and whether verification has succeeded. The connection to the storage system can be re-verified at any time by selecting “Validate” from the actions.
See also
For more information on adding storage systems, see DR Storage Systems.
Step 3 - Link Clusters to Storage Systems
After adding a storage system, the next step is to link it to the source cluster running the workloads that need to be protected. To do this, go to the DR/Clusters page and select the source cluster. Then click on Link Storage System and select the Storage System added above. CloudCasa requires an explicit connection to each cluster because the same storage system can be configured in different ways on different clusters (e.g. with a different namespace and secret).
In a similar way, configure the storage system used by the target cluster and link it.
See also
For more information on linking storage systems to clusters, see DR Clusters.
Step 4 - Create DR Plan
The most important part of configuring CloudCasa DR functionality is creating a DR Plan. A DR Plan describes the workload(s) that will be protected, as well as the source and destination clusters and the storage systems involved. To create a new DR Plan, go to the DR/Plans page and select Add DR Plan. Select source and target clusters as well as their respective storage systems (these are the storage systems linked to the clusters). You can then select the workloads that need to be protected.
The following types of selections are allowed:
Namespaces - In this case, all Deployments, StatefulSets, and VMs in the selected namespaces are protected.
Deployments
StatefulSets
VMs
Note that you can select either Namespaces or a combination of Deployments, StatefulSets, and VMs. You cannot combine the two.
The next step in defining a DR Plan is to provide an “Inventory PVC”. This is an existing PVC in the cloudcasa-io namespace on the source cluster that will be used to store resource data. This PVC must have been created already, and its underlying storage volume must be configured with replication to the destination storage system/cluster. The administrator is expected to have previously created this PVC in the cloudcasa-io namespace using the same storage controller used for application PVCs.
Lastly, select the interval at which storage inventory jobs can be run for this DR Plan. The default value is 6 hours. A storage inventory job collects information about all the PVCs used by the selected workloads and their underlying storage volumes, including their replication status.
As soon as a DR Plan is created, an inventory job is triggered. From the DR Plans page, clicking on a plan name will show information about related storage volumes and consistency groups (CGs), as well as related activity including inventory jobs and their statuses.
On the source cluster, you will see a new agent component called “dragent” running in the cloudcasa-io namespace. Its job is to watch resources from all of the selected workloads and record any changes to the inventory PVC.
See also
For more information on DR Plans, see DR Plans.
At this point, the DR setup is complete. If there are any errors in running inventory jobs, you will receive notifications of them.
You can define multiple DR Plans covering different workloads. Note, however, that consistency groups cannot span the selected workloads in the DR Plan/DR Recovery Job. This is because failover always happens at the CG level, so if the CG contains volumes that are outside of the selected workloads, they would be failed over as well.
See also
See the CloudCasa DR Failover Guide for a discussion of how to trigger DR failover/failback.